Quantcast
Channel: WORKLOAD AUTOMATION COMMUNITY - Blogs
Viewing all 209 articles
Browse latest View live

Custom dashboard: the fifth element that gives you control over all of your environments

$
0
0
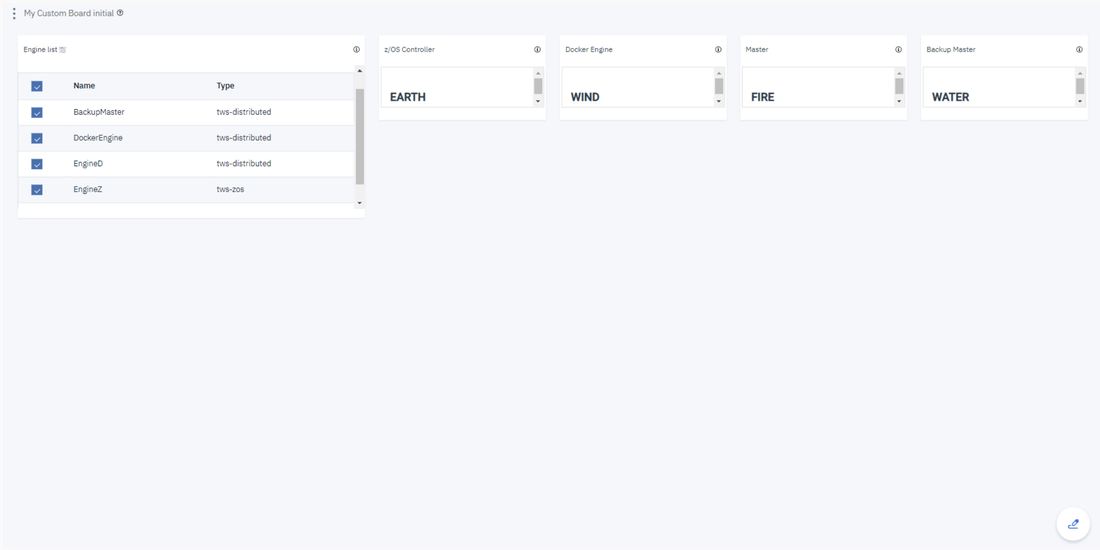
No matter if your environment is based on rock solid z/OS controller or on light weight and easily scalable docker instances, or if your distributed, on premises master and backup master are rocking your workload as fire and water. 
 
Earth, wind, water and fire… iyou want to have control over each element you need the fifth spirt: your custom dashboard! 
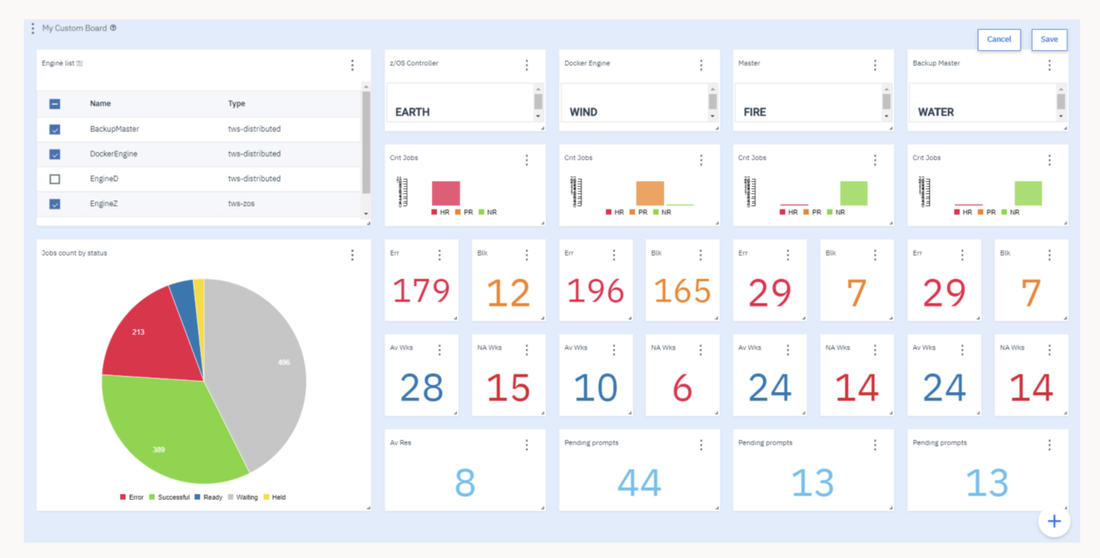
 
It’easy to create and customize your dashboard to have control over every single important aspect for you and your organization at a glance. 
Each dashboard is composed by several data sources and widgets that can be customized and combined together in the new era of dashboards. 

But you can also optimize your dashboard to monitor different kinds of environments all together. Let’s see how it works. 
Cross-engine widgets 
If you need an overview of the entire workload across all of your environments, you can use for example the Jobs count by status datasource in a pie chart to have a quick overview of how many jobs are waiting, running or ended in error or in successful state. 
 
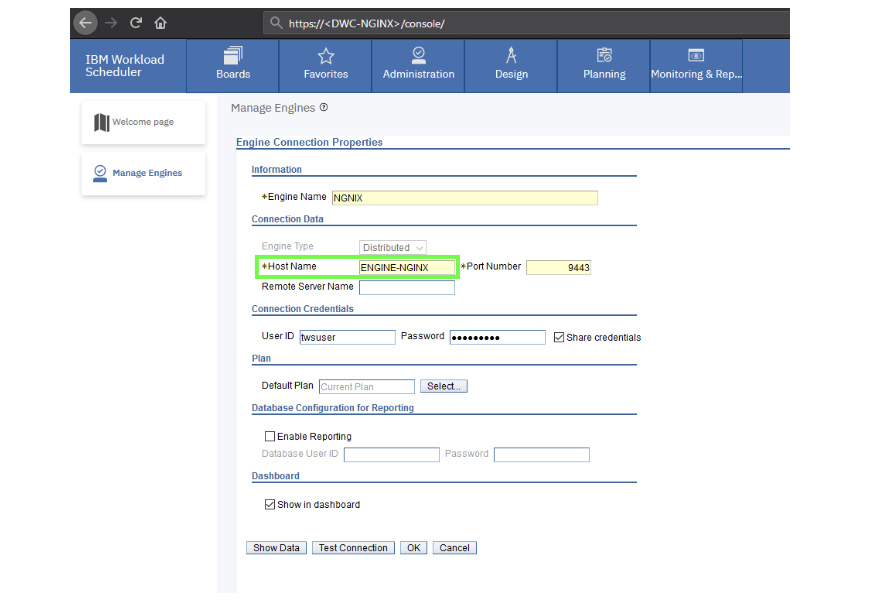
To make this datasource and widget works across multiple environment you need to add firsan engine list 
D engine list and Z engine list are optimized for homogeneous environment, while for an hybrid (distributed and z/OS) environment you have to select the Engine list. 
 
At this point you can add also the desired widget and customize all fields as you can see below. 
Widgets based on datasource with pre-defined engine. 

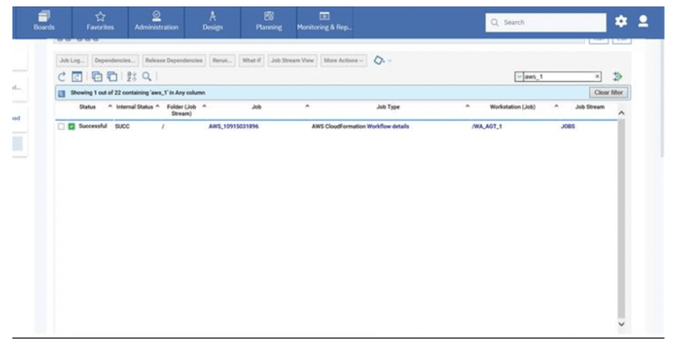
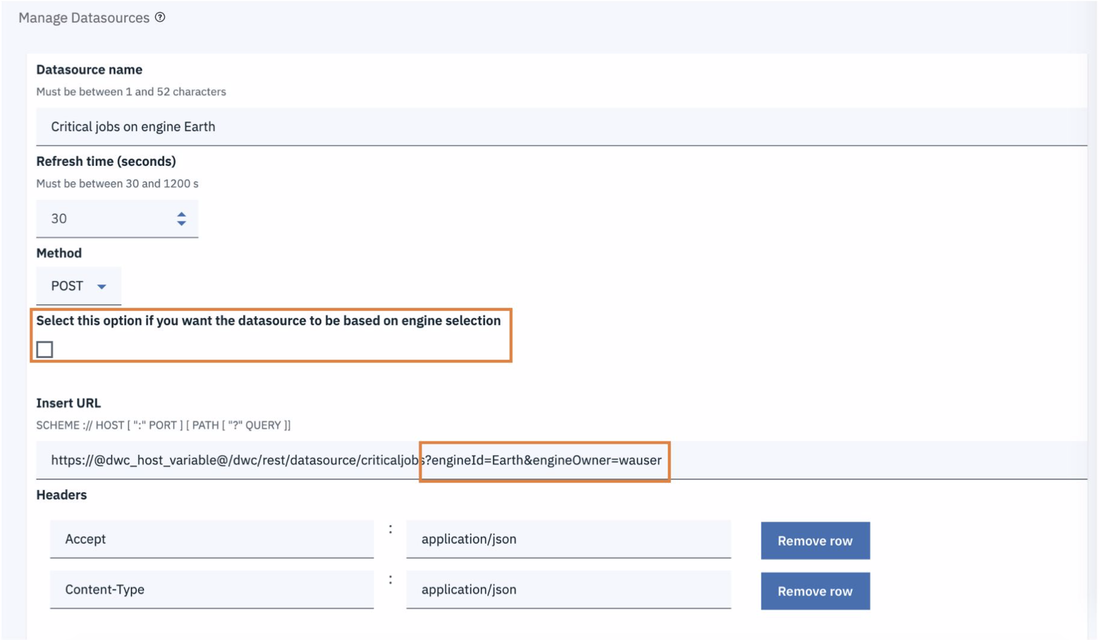
​However,
 the best way to monitor hybrid environment is to use specific datasources for each engine. 
 
For example, if you need to monitor the Critical jobs 
  • Duplicate the Critical jobs by status datasource and name it after the engine name 
  • Edit it 
  • Deselect the checkbox “Select this option if you want the datasource to be based on engine selection 
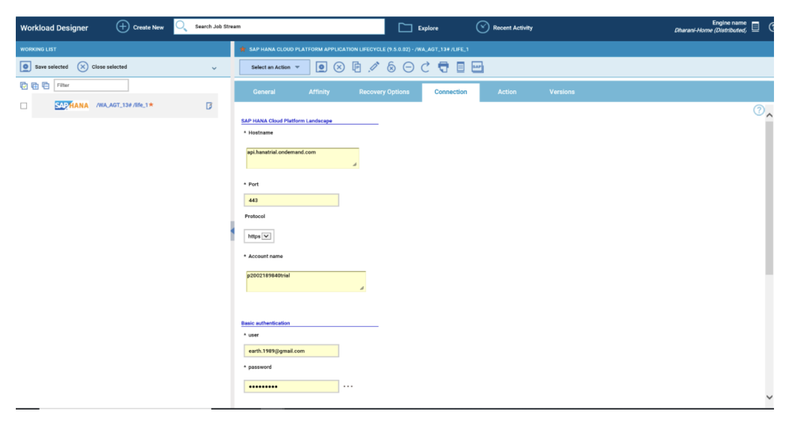
  • Add the engine name and the engine owner in the URL 
  • Save it 

Repeat the three steps for each engine.
 The customization steps are the same for distributed and z/OS engine.  
Now that your 4 datasources are ready you can go back to your dashboard and easily create the four widgets. 
As you can see, once you have customised your first widget, you can just duplicate it and change the associated datasourceIt’s easy and time saving; you can take advantage of this tip every time you want to define multiple widgets on similar datasources. 

Add filters to your datasources 
You can also refine the datasources to monitor specific subset of your workload, for example to count only the jobs belonging to a specific Line of Business or the workstations matching a specific naming convention. 
 
In case you are working on a REST datasourcesuch as the job count by status, you can just start from an existing datasource and duplicate it. 

​Remember to deselect the checkbox “Select this option if you want the datasource to be based on engine selection” and specify the engine name and owner (if they are not already configured). Then you have to simply add the desired filters in the body section. 
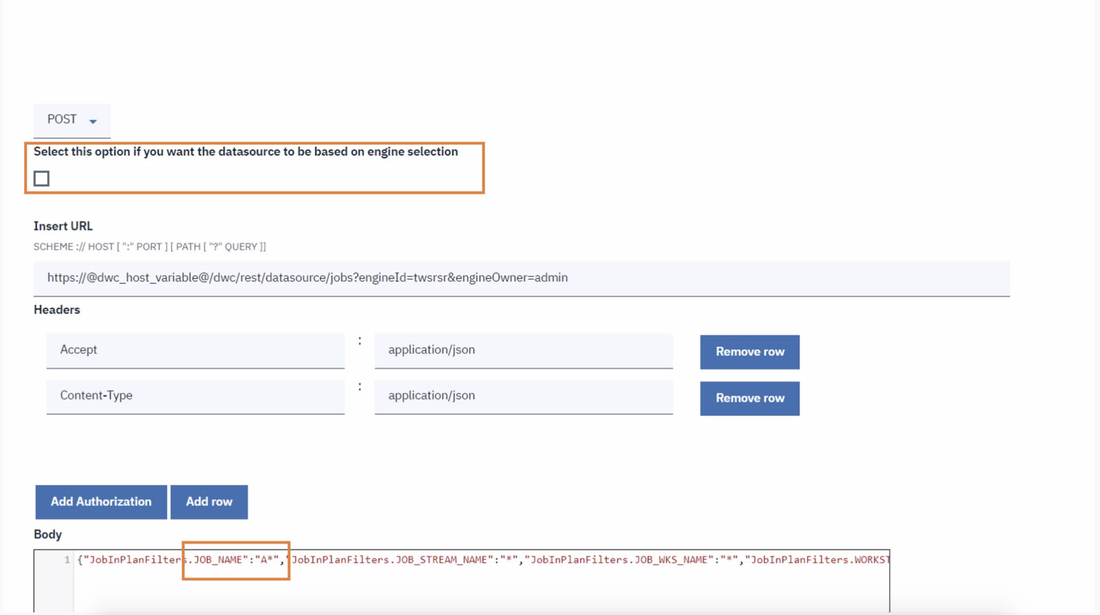
Note that the filters available on distributed engines are JOB_NAME, JOB_STREAM_NAMEJOB_WKS_NAME and WORKSTATION, while on z/OS engines are allowed only the filters on JOB_NAME, JOB_STREAM_NAME and JOB_WKS_NAME. 
 
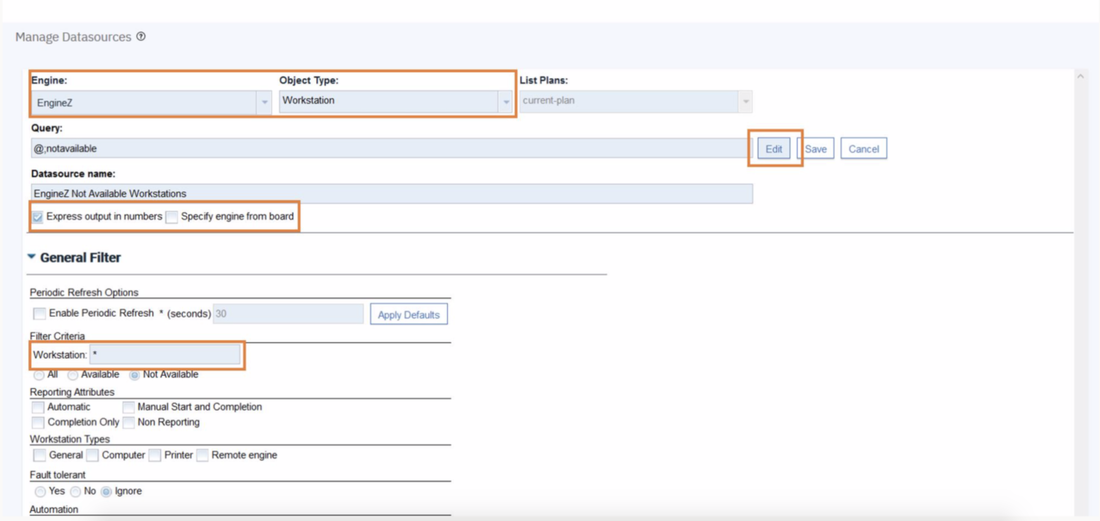
In case you are working on a Plan datasource, such as the Available or Unavailable Workstationsit’s even easier: 
  • Create a new Plan datasource or duplicate an existing one; 
  • Select the desired Engine and the Object Type you are looking for; 
  • Select the “Express output in numbers” and deselect the “Specify engine from board to optimize the performance of the datasource; 
  • Click on the Edit button to display and fill in all the desired filters available for the current datasource. 
  • Save it 
Once that you have learned how to manage, customizefilter and even optimize your plan and rest api datasources you can basically have under control everything in your environmentNo matter if you are interested in the unanswered prompts on your distributed master or in the special resources on your z/OS controllernow you can tames all of your environments from a single point of control. 
 

Author's BIO
Enrica Pesare, User eXperience Designer – Workload Automation, HCL  Technologies

Enrica is a Computer Scientist highly focused on Human Centered Design and User Experience. After completing a PhD at the University of Bari (Italy) she joined the HCLSoftware Rome Lab as a Software Engineer in the Quality Assurance team of Workload Automation and as the owner of the Workload Automation production environment.Since 2018, she is part of the UX design team for Workload Automation. 
Davide Canalis, Software Engineer, HCL Technologies 

Davide is graduated in Mathematics, works as a Software Engineer at HCL Products and Platforms in Rome software development laboratory and he is a member of z/OS development IZWS team since April 2017 becoming the RestApi expert of the team. 
Elvira Zanin, Software Engineer, HCL Technologies 

Elvira Zanin is a Software Engineer on the Workload Automation development team located in HCL Rome Hub. She is currently based in the WebUI development team but she was involved in Test automation team and Add-ons development team also. Elvira has experience with Dynamic Workload Console. She completed her degree in Computer Science at University of Salerno and currently lives in Rome, Italy. 

Enforce Workload automation continuous operation by activating Automatic failover feature and an HTTP load balancer

$
0
0
How important is that your Workload Automation environment is healthy, up and running, and there are no workload stops or delays? What happens if your Master Domain Manager becomes unavailable or it is affected by downtime?  What manual recovery solution you must do when it happens? How can I distribute simultaneously requests to several application servers in my configurations if my primary server is drowning? How can I hourly monitor the workload automation environment healthy in an easy way? How can I have an alerting mechanism? 
The answer is: Workload Automation 9.5 FP2 with Automatic failover feature enabled, combined with NGINX load balancer! 

Let start to introduce the components participating to the solution: 

= Workload Automation 9.5 FP2 introduces the Workload Automatic failover feature = When the active master domain manager becomes unavailable, it suddenly enables an automatic switchover to a backup engine and event processor server. It ensures continuous operation by configuring one or more backup engines so that when a backup detects that the active master becomes unavailable, it triggers a long-term switchmgr operation to itself. You can define potential backups in a list by adding preferential backups at the top of the list. The backup engines monitor the behaviour of the master domain manager to detect anomalous behaviour. 

= NGINX load balancer = Load balancing across multiple application instances is a commonly used technique for optimizing resource utilization, maximizing throughput, reducing latency, and ensuring fault-tolerant configurations. It is possible to use NGINX as a very efficient HTTP load balancer to distribute traffic to several application servers and to improve performance, scalability and reliability of web applications. Nginx acts as a single-entry point to a distributed web application working on multiple separate servers. 
 
Let's continue analysing our use case solution: 
We experiment the solution by defining and using this environment during the formal test phase for 9.5 FP2 project. 

​The 
NGINX load balancer comes handy in to have a fully high available Workload Automation (WA) environment. For the Dynamic Workload Console (DWC), you just need to ensure that it is connected to an external DB and link it to a load balancer to dispatch multiple requests coming from the same user session of one DWC instance. We used the DWC-NGINX configuration as the only access point for all the DWC instances present in our test environment. 
Figure 1: DWC logging page for DWC-NGINX 
After configuring DWC- NGINX, we configured a new server connection on it, in order to have already managed the automatic switching among masters when it occurs.  The best way to do this is to define a load balancer (named ENGINE-NGINX in Figure 3) in front of your master machines and behind the DWC-NGINX machines, and specifying the public hostname of the <DWC-NGINX> load balancer as the endpoint of your server connections in the DWC or in your client apps. In this way, you have only a hostname that maps the current active master, so you do not take care about current master management. 
Figure 2Engine-NGINX connection into DWC-NGINX 

Another feature introduced by 9.5 fix pack 2 allows the backup workstations to manage a subset of HTTP requests (For example: requests on the Workload Service Assurance) coming from the other workstations in the environment. Backup workstation receives all HTTP requests from the active master, manages the possible ones and re-sends the requests it cannot manage to the active master itself. 
Figure 3: Automatic Failover SVT environment 

In Figure 1, the load balancers are depicted as two distinct ones, the most general case possible, but for the SVT environment, we have used a single component for balancing the request to the DWC machines and to the server machines. 
 
Let's introduce the configuration we used to orchestrate the 3 components in the solution: 

WA automatic failover configuration: 

We used the default configuration of Automatic failover installed with a new WA server, defined by the following WA global options.  

enAutomaticFailover = yes 
enAutomaticFailoverActions= yes 
workstationEventMgrListInAutomaticFailover (empty) 
workstationMasterListInAutomaticFailover (empty) 

For more info about global options meaning, see the official documentation 

Let’s go in drill down into the workstationMasterListInAutomaticFailover global option. After the first test cycle, we changed its default value. We defined multiple backup masters in the list and we define the order of which of them should be considered as the first candidate master for the switching operation: 

workstationMasterListInAutomaticFailover = BKM1, BKM2, MDM 

This parameter contains an ordered list of workstations separated with comma that acts as backups for the main processor. If a workstation is not included in the list, it will never be considered as a backup. The switch is first attempted by the first workstation in the list, and otherwise an attempt is made from the second row, and so on. These switches take place after a 5-minute threshold period, so if the first backup is not eligible, it has to spend 5 more minutes before the switch takes place on the next backup in the list. This offers an additional layer of control over backups. because it allows you to define a list of eligible workstations. if no workstation is specified in this list, all managers of the backup master domain in the domain are considered eligible backups. 

NGINX load balancer configuration: 

Engine: 
For engine server machines, we used the round-robin load balancing mechanisms. Going down the list of servers in the group, the round‑robin load balancer forwards a client request to each server in turn. On round-robin load balancing each request can be potentially distributed to a different server. There is no guarantee that the same client will be always directed to the same server. The main benefit of round‑robin load balancing is that it is extremely simple to implement. We used a weighted round-robin: a weight is assigned to each server, in our case we have balanced the load equally but higher is the weight, the larger the proportion of client requests the server can be receives. 
 
DWC: 
For DWC server machines, we used ip-hash configuration. By defining ip-hash configuration, the client’s IP address of coming request is used as a hashing key to determine what server in a server group should be selected for the client’s requests. This method ensures that the requests from the same client will always be directed to the same server except when this server is unavailable. 
 
We applied the following complete NGINX configuration  for the DWC and Engine component respectively: 
upstream wa_console { ##DWC configuration 
        ip_hash 
        server DWC_SERVER1 max_fails=3 fail_timeout=300s; 
        server DWC_SERVER2 max_fails=3 fail_timeout=300s;     
        keepalive 32; 
    } 
 
server{ 
    listen          443 ssl; 
    ssl_certificate /etc/nginx/certs/nginx.crt; 
    ssl_certificate_key /etc/nginx/certs/nginxkey.key; 
    ssl_trusted_certificate /etc/nginx/certs/ca-certs.crt; 
    location / 
    { 
           proxy_pass https://wa_console; 
        proxy_cache off; 
        proxy_set_header Host $host; 
        proxy_set_header Forwarded " $proxy_add_x_forwarded_for;proto=$scheme"; 
        proxy_set_header X-Real-IP $remote_addr; 
        proxy_set_header X-Forwarded-For $proxy_add_x_forwarded_for; 
        proxy_set_header X-Forwarded-Proto $scheme; 
        proxy_set_header X-Forwarded-Host   $host; 
        proxy_set_header X-Real-IP          $remote_addr; 
        proxy_set_header X-Forwarded-Port  443; 
    } 
  } 
 
 upstream wa_server_backend_https { ##SERVER configuration 
       server ENGINE_SERVER1  weight=1; 
       server ENGINE_SERVER2  weight=1 
    } 
server{ 
    listen          9443 ssl; 
    ssl_certificate /etc/nginx/certs/nginx.crt; 
    ssl_certificate_key /etc/nginx/certs/nginxkey.key; 
    ssl_trusted_certificate /etc/nginx/certs/ca-certs.crt; 
    location / 
    { 
        proxy_pass https://wa_server_backend_https; 
        proxy_cache off; 
        proxy_set_header Host $host; 
        proxy_set_header X-Real-IP $remote_addr; 
        proxy_set_header X-Forwarded-For $proxy_add_x_forwarded_for; 
        proxy_set_header X-Forwarded-Proto $scheme; 
        proxy_set_header X-Forwarded-Host   $host; 
        proxy_set_header X-Real-IP          $remote_addr; 
        proxy_set_header Connection "close"; 
    } 
  } 
 
Let's describe how we performed Automatic failover and NGINX test scenarios: 

We focused on various verification test scenarios in order to verify the effectiveness of the load balancer dispatching for active master and eligible backups and the automatic failover triggering in case of active master triggered failure by a sort of chaos engineering test procedure. 

WA SERVER 

= Failure of the main processes of Workload Automation (Batchman, Mailman, Jobman) = 

We randomly introduced engine server failure of the main processes of Workload Automation in the active master workstation. 

One of the scenarios that triggers automatic failover is the failure of one or more Workload Automation main processes: Batchman, Mailman and Jobman. 

​Each main process, as default after abnormal stopping, is automatically restarted.  In order to simulate an abnormal failure in the active master workstation, you need to kill one or more of the main processes, at least three consecutive times, the process is not restarted. So after 5 minutes, the automatic failover process switches the master role to first healthy backup workstation available. 

NOTE:  

Keep in mind that we do not have the automatic failover if Netman process is killed or stopped. 

= Stop or failure of the Liberty Application Server = 
You can trigger the automatic failover process if you kill the Liberty Application Server in the active master workstation for at least 5 minutes. We performed both scenarios, and if the Liberty process is not able for 5 minutes to restart, first available and eligible backup workstation becomes new master workstation.  If the Liberty Application Server is restarted before 5 minutes in the active master workstation (it normally happens because the appserverman process restart it!), the automatic failover action is not performed because the master is available to execute the processes. 

= Mailbox corruption = 
We tested also the scenario where a Mailbox.msg file corruption happens on the active master workstation and caused the automatic failover switching process to another eligible and healthy backup workstation. We simulated a corruption of the msg files or substituted the original msg file with an old version corrupted file to cause the automatic switching. Thank God, we had lot of problem to simulate the corruption! 

DWC 
We focused on the following test cases in order to verify the correct activity of the load balancer for both DWC instances: 

= Multiple access to DWC-NGINX use case =  
We tried multiple simultaneously user accesses to the DWC-NGINX entry point from different machines while multiple users are performing several tasks on plan, database, reporting and custom dashboard monitoring. Each user was able to perform its tasks without interruption or latency, as a user logged in to a not balanced DWC instance. The workload tasks coming from multiple accesses have been correctly dispatched between the two DWC-SERVER, avoiding to congest only one instance with multiple coming requests. 

= Redirecting traffic to the active DWC if one of this is meting problem = 
We tried to randomly stop one of the DWC instance, in order to verify that the DWC-NGINX correctly redirect traffic to the instance that is active, allowing the user to continue work on the DWC without big mess. The only disruption is for users that had a session opened in the stopped DWC instance, they need to re-login to have a new session on the only available DWC instance. 
 
Conclusion 

Don't be stopped by unexpected failures anymore, with Workload Automation 9.5 Fix Pack 2 you can rest easy during the night, let go to a happy hour or to the cinema or watch a football match, the automatic failover will monitor the health of the product and will guarantee the continuous operation! 

Author's BIO
Serena Girardini, Workload Automation Test Technical Leader, HCL Technologies 

Serena Girardini is the System Verification Test Team leader for the Workload Automation product in distributed environments. She joined IBM in 2000 as a Tivoli Workload Scheduler developer and she was involved in the product relocation from San Jose Lab to Rome Lab during a short term assignment in San Jose (CA).  For 14 years, Serena gained experience in Tivoli Workload Scheduler distributed product suite as developer, customer support engineer, tester and information developer. She covered for a long time the role of L3 fixpack releases Test Team Leader and in this period she was a facilitator during critical situations and upgrade scenarios at customer site. In her last 4 years at IBM she became IBM Cloud Resiliency and Chaos Engineering Test Team Leader. She joined HCL in April, 2019 as expert Tester for IBM Workload Automation product suite and she was recognized as Test Leader for the product porting to the most important Cloud offerings in the market. She has a math bachelor degree. 
Filippo Sorino, Workload Automation Test Engineer, HCL Technologies 

He joined HCL in September 2019 as Junior Software Developer starting to work as Tester for IBM Workload Automation product suite.  He has a computer engineering bachelor degree. 

Case Study : Travel Expense Reimbursement with Workload Automation

$
0
0
This Blog aims to showcase a Case Study on how Travel Expense Reimbursement can be evaluated in a company using Workload Automation. Typically every company would have a Portal where Employees would login and report all expenses made against a Travel and the same is reimbursed based on their Eligibility . 
Consider a company has developed a similar Portal and an Employee fills out a Form with all expenses incurred during a Travel.
 
The expenses incurred during the travel is sent from the Portal in the form of json data ,let’s say below was the json Data sent from the Portal : 
 
{"Lodging": 58000, 
        "AirTicket": 7000, 
        "Conveyance": 20000, 
        "AirportTransfer": 5000, 
        "EmployeeID": 55164281} 
 
The json Data captured is sent through a Python program to a Mongo DB , lets say the below Python Program is the program called from the Portal to send the Data : 
 
import pymongo 
from pymongo import collection 
from pymongo import MongoClient 
import pprint 
myclient = MongoClient("mongodb+srv://XXXXXXX:XXXXXXX@cluster0-31gzu.mongodb.net/NewDB?retryWrites=true&w=majority") 
db = myclient.DBNew 
print(db) 
NewCol = db.collection 
print(NewCol) 
post = [{"Lodging": 46000, 
        "AirTicket": 19000, 
        "Conveyance": 36000, 
        "AirportTransfer": 5000, 
        "EmployeeID": 50897688}] 
#posts = db.posts 
#print(posts) 
result = NewCol.insert_many(post) 
print(result.inserted_ids) 
 
Post importing the pymongo Driver , establishing a Client Connection , switching to the DB and getting at the Collection Object , the last lines of the Program describe the actual query run against the DB , the below would be called through an IWS Job as follows : 
The job would call the python Program using the python binary through an IWS Native Windows Job Type on a Windows Agent. 
The Job would run against the MongoDB and store the JSON Data relating to the Travel expense as follows in a collection as a Document : 
Eligibility Criteria (managed through DB2 Database) : 
The Eligibility Criteria under each Expense Head is stored in a DB2 Database as follows : 
The expenses are captured under 4 Heads , Boarding Miscellaneous , Conveyance , Airport Transfer and Air Ticket Charges. 
We would be using 4 Jobs which would query the EXPREIMBURSE Table to capture expenses under each Eligibility Head , these would be DB2 Jobs using the JDBC Driver readily available on the IWS MDM for DB2 . 
 
The DB2 Job Type would take in the Native JDBC Driver path available on IWS MDM’s Dynamic Agent and DB2 credentials , the actual SQL Query and Query Output redirected to a specific file for each Eligibility Criteria , in this case the Lodging Eligibility is stored under /tmp/Lodging_Elig 
Likewise we would have similar jobs for Eligibility of Conveyance , Airticket , Airport Transfer etc : 
Query Expense Jobs : 

Inorder to extract the Expense under each head from the MongoDB “NewDB” , we would again have Python Programs which would run find_one functions from the Collection Class and would be as below : 
 
import pymongo 
from pymongo import collection 
from pymongo import MongoClient 
import pprint 
myclient = MongoClient("mongodb+srv://XXXXXXX:XXXXXX@cluster0-31gzu.mongodb.net/NewDB?retryWrites=true&w=majority") 
db = myclient.NewDB 
#print(db) 
NewCol = db.collection 
#print(NewCol) 
post = [{"Lodging": 50000, 
        "AirTicket": 70000, 
        "Conveyance": 30000, 
        "AirportTransfer": 5000, 
        "EmployeeID": 5162143}] 
#posts = db.posts 
#print(posts) 
result = NewCol.find_one({"EmployeeID": 55164281}, {"AirTicket": 1}) 
print(result['AirTicket']) 
 
The Query only picks the AirTicket Column of the Employee ID in question. Likewise we would have 4 different programs for each Expense Head : 
 
import pymongo 
from pymongo import collection 
from pymongo import MongoClient 
import pprint 
myclient = MongoClient("mongodb+srv://XXXXXX:XXXXXXX@cluster0-31gzu.mongodb.net/NewDB?retryWrites=true&w=majority") 
db = myclient.NewDB 
#print(db) 
NewCol = db.collection 
#print(NewCol) 
post = [{"Lodging": 50000, 
        "AirTicket": 70000, 
        "Conveyance": 30000, 
        "AirportTransfer": 5000, 
        "EmployeeID": 5162143}] 
#posts = db.posts 
#print(posts) 
result = NewCol.find_one({"EmployeeID": 50897688}, {"Conveyance": 1}) 
print(result['Conveyance']) 
--------------------------------------------------------------------------- 
import pymongo 
from pymongo import collection 
from pymongo import MongoClient 
import pprint 
myclient = MongoClient("mongodb+srv://XXXXXXXX:XXXXXXXX@cluster0-31gzu.mongodb.net/NewDB?retryWrites=true&w=majority") 
db = myclient.NewDB 
#print(db) 
NewCol = db.collection 
#print(NewCol) 
post = [{"Lodging": 50000, 
        "AirTicket": 70000, 
        "Conveyance": 30000, 
        "AirportTransfer": 5000, 
        "EmployeeID": 5162143}] 
#posts = db.posts 
#print(posts) 
result = NewCol.find_one({"EmployeeID": 50897688}, {"Lodging": 1}) 
print(result['Lodging']) 
--------------------------------------------------------------------------- 
import pymongo 
from pymongo import collection 
from pymongo import MongoClient 
import pprint 
import json 
myclient = MongoClient("mongodb+srv://XXXXXXXX:XXXXXXX@cluster0-31gzu.mongodb.net/NewDB?retryWrites=true&w=majority") 
db = myclient.NewDB 
NewCol = db.collection 
post = [{"Lodging": 50000, 
        "AirTicket": 70000, 
        "Conveyance": 30000, 
        "AirportTransfer": 5000, 
        "EmployeeID": 5162143}] 
#posts = db.posts 
#print(posts) 
result = NewCol.find_one({"EmployeeID": 50897688}, {"AirportTransfer": 1}) 
#result_final = str(result[1]) 
#result_final = str(str(result[67])+str(result[68])+str(result[69])+str(result[70])) 
#print(result_final) 
print(result['AirportTransfer']) 
 
 
We would run the below jobs to run the above Programs which would query under each expense head , the jobs would be Native Windows Jobs calling the Python binary followed by the full path of the Python Program :
Store Jobs for Expenses : 
 
Store Jobs for expenses would be executable Job Type and would set the TWS Environment before calling the jobprop binary of IWS to store the Joblog of the preceding Expense Job in a IWS Variable: 
The jobprop uses Variable passing features of IWS to store the Expenses incurred against Air Tricket in a Variable EXPENSE_AIRTICKET : 
Likewise Airport Transfer Expenses would be stored in an IWS Variable called  
EXP_AIRTRANS : 
The same applies for Lodging and Conveyance and every expense head is captured in a separate IWS Variable through jobprop and passed onto other jobs in the IWS Jobstream. 
 
Store Jobs for Eligibility : 
These set of jobs store the Eligibility for each Expense Head from the DB2 table EMP.EXPREIMBURSE and store the same in an IWS Variable using jobprop utility : 
The Jobprop utility of IWS is used to store the variable ELIGLODGING , Eligibility for Lodging , this is initially captured from the Output File of the DB2 Job : /tmp/Lodging_Elig and then passed using the jobprop utility to an IWS Variable ELIGLODGING . 

​The same concept is applied for all the Store Eligibility Jobs and stored in IWS Variables passing from the Output files of the DB2 Jobs.
 
Check Jobs : 
The below set of Jobs evaluates the Expense under each Expense Head against Eligibility and decides whether it is within the limit or exceeding the limit beyond eligibility . These would pass SUCC Output Conditions : BEYELIGAIRTRANS (in the below case)using Conditional Dependencies of Workload Automation. 

​The Job would be of type Executable and using the Variable Passing Features of IWS would fetch the Variable from preceding Predecessors : Store Eligibility and Store Expense Jobs : 
In the above executable Job type , as you can see , the ELGAIRTRANS and EXPAIRTRANS Variables pick the variables passed from preceding Eligibility and Expense Jobs and are stored and compared through a simple if and the difference if Expense is more than Eligibility is stored through jobprop utility in a variable BEYONDAITRANS and RC=1 is passed . The RC=1 Return Code is mapped to condition BEYELIGAIRTRANS . 
 
Likewise we have similar Check Jobs for Airport Ticket , Lodging and Conveyance : 
Mailing Jobs : 
The Conditions passed by the CHECK Jobs if satisfied would trigger a Mailing Job which would send out a mail through SendMail command to the Manager of the Employee stating the exact Expense head where the Expense exceeds the Eligibility and the exact amount beyond which it exceeds the expense head : 
Conditional Dependencies within the Jobstream : 
The RC=1 is passed as a Condition from the Check Job into the Mailing Job , incase the Employee Eligibility for an Expense Head is more than Eligibility Amount . 
 
The Overall Jobstream Definition would look as below : 
SCHEDULE MASTER_DA#EXPENSE_REIMBURS 
: 
AGENT#EXPENSE_SUBMIT_PORTAL 
AGENT#EXPENSE_AIRPORT_TRANSFER 
 FOLLOWS EXPENSE_SUBMIT_PORTAL 
AGENT#EXPENSE_AIRTICKET 
 FOLLOWS EXPENSE_SUBMIT_PORTAL 
AGENT#EXPENSE_CONVEYANCE 
 FOLLOWS EXPENSE_SUBMIT_PORTAL 
AGENT#EXPENSE_LODGING 
 FOLLOWS EXPENSE_SUBMIT_PORTAL 
MASTER_DA#QUERY_ELIGIBILITY_AIRPORTTRANS 
 FOLLOWS EXPENSE_SUBMIT_PORTAL 
MASTER_DA#QUERY_ELIGIBILITY_AIRTICKET 
 FOLLOWS EXPENSE_SUBMIT_PORTAL 
MASTER_DA#QUERY_ELIGIBILITY_CONVEYENCE 
 FOLLOWS EXPENSE_SUBMIT_PORTAL 
MASTER_DA#QUERY_ELIGIBILITY_LODGING 
 FOLLOWS EXPENSE_SUBMIT_PORTAL 
MASTER_DA#STORE_ELIGIBILITY_AIRPORTTRANS 
 FOLLOWS QUERY_ELIGIBILITY_AIRPORTTRANS 
MASTER_DA#STORE_ELIGIBILITY_AIRTICKET 
 FOLLOWS QUERY_ELIGIBILITY_AIRTICKET 
MASTER_DA#STORE_ELIGIBILITY_CONVEYANCE 
 FOLLOWS QUERY_ELIGIBILITY_CONVEYENCE 
MASTER_DA#STORE_ELIGIBILITY_LODGING 
 FOLLOWS QUERY_ELIGIBILITY_LODGING 
MASTER_DA#STORE_EXPENSE_AIRPORT_TRANSFER 
 FOLLOWS EXPENSE_AIRPORT_TRANSFER 
MASTER_DA#STORE_EXPENSE_AIRTICKET 
 FOLLOWS EXPENSE_AIRTICKET 
MASTER_DA#STORE_EXPENSE_CONVEYANCE 
 FOLLOWS EXPENSE_CONVEYANCE 
MASTER_DA#STORE_EXPENSE_LODGING 
 FOLLOWS EXPENSE_LODGING 
MASTER_DA#CHECK_AIRPORT_TRANSFER 
 FOLLOWS STORE_ELIGIBILITY_AIRPORTTRANS 
 FOLLOWS STORE_EXPENSE_AIRPORT_TRANSFER 
MASTER_DA#CHECK_AIRTICKET 
 FOLLOWS STORE_ELIGIBILITY_AIRTICKET 
 FOLLOWS STORE_EXPENSE_AIRTICKET 
MASTER_DA#CHECK_CONVEYANCE 
 FOLLOWS STORE_ELIGIBILITY_CONVEYANCE 
 FOLLOWS STORE_EXPENSE_CONVEYANCE 
MASTER_DA#CHECK_LODGING 
 FOLLOWS STORE_ELIGIBILITY_LODGING 
 FOLLOWS STORE_EXPENSE_LODGING 
DAUNIX#MAIL_AIRPORT_TRANSFER 
 FOLLOWS CHECK_AIRPORT_TRANSFER IF BEYELIGAIRTRANS 
DAUNIX#MAIL_AIRTICKET 
 FOLLOWS CHECK_AIRTICKET IF BEYELIGAIRTKT 
DAUNIX#MAIL_CONVEYANCE 
 FOLLOWS CHECK_CONVEYANCE IF BEYELIGCONV 
DAUNIX#MAIL_LODGING 
 FOLLOWS CHECK_LODGING IF BEYELIGLODG 
END 
 
So, with Conditional Dependencies and Variable passing Features of Workload Automation, we can Automate the Expense Reimbursement Process and notify Manager’s in specific cases when the Eligibility is exceeded.  

Author BIO
Sriram V, Tech Sales, HCL Technologies
​ 
I’ve been working with Workload Automation for the last 11 years in various capacities like WA Administrator , SME , India-SME , later joined the Product team supporting Workload Automation on SaaS, recently moved to Tech Sales and Lab Services of Workload Automation. ​

Make the deployment easier, get the most from Workload Automation in OpenShift

$
0
0
Can you have your desired number of Workload Automation (WA) agent, server and console instances running whenever and wherever? Yes, you can 

Starting from the Workload Automation version 9.5 fix pack 2, you can deploy the server, console and dynamic agent by using Openshift 4.2 or later version platforms. This kind of deployment makes Workload Automation topology implementation 10x faster and 10x more scalable compared to the same deployment in the on-prem classical platform. 
Workload Automation provides you an effortless way to create, update and maintain both the installed WA operator instance and WA component instances by leveraging also the Operators feature introduced by Red Hat starting from OCP 4.1 version. 
In this blog, we address the following use cases by using the new deployment method: 
  1. Download and Install WA operator and WA component images 
  2. Scheduling - Scale UP and DOWN the WA instances number  
  3. Monitoring WA resources to improve Quality of Service by using OCP dashboard console 
 
Download and Install WA operator and WA components images 

WA operator and pod instances prerequisites 
Before starting the WA deployment, ensure your environment meets the required prerequisites. For more information, see https://www.ibm.com/support/knowledgecenter/SSGSPN_9.5.0/com.ibm.tivoli.itws.doc_9.5/README_OpenShift.html 
 
Download WA operator and components images 
Download the Workload Automation Operator and product component images from the appropriate web site. Once deployed, the Operator can be used to install the Workload Automation components and manage the deployment thereafter. 

​The following are the available packages: 
 
Flexera (HCL version):  
  • 9.5.0-HCL-IWS_OpenShift_Server_UI_Agent_FP0002.zip containing the images for all HCL components. Download this package to install either all or select components (agent, server, console). 
  • 9.5.0-HCL-IWS_OpenShift_Agent_FP0002 containing the HCL agent image 
 
Fixcentral (IBM version) 
  • 9.5.0-IBM-IWS_OpenShift_Server_UI_Agent_FP0002.zip containing the images for all IBM components. Download this package to install either all or select components (agent, server, console). 
  • 9.5.0-IBM-IWS_OpenShift_Agent_FP0002 containing the IBM agent image 
 
Each operator package has the following structure  (keep it in mind, it can be useful for the steps we are going to see later): 
The README file in the Operator package has the same content of the url previously provided in the prerequisites section. 
Once the WA Operator images have been downloaded, you can go further by downloading the Workload automation component images. 

In this article, we will demonstrate what happens when you download and install the IBM version of the WA operator and how it can be used to deploy the server (master domain manager), console (Dynamical Workload Console), and dynamic agent components. 
 
Deploy the WA Global Operator in OCP 
Now we focus on the creation of the Operator to be used to install the Workload Automation server, console and agent components. 
NOTE: 
Before starting the deploy, proceed as follows: 
  • Push the server, console and agent images to your private registry reached by OCP cloud or to the Internal OCP registry. 
  • On an external VM reached by the OCP cloud, install the relational DB needed for the server and/or console persistent data storing.
 
## Building and pushing the Operator images to a private registry reachable by OCP cloud or Internal OCP registry. 
To generate and publish the Operator images by using the Docker command line, run the following commands: 
 
    docker build -t <repository_url>/IBM-workload-automation-operator:9.5.0.02 -f build/Dockerfile . 
    docker push <repository_url>/IBM-workload-automation-operator:9.5.0.02 
 
where <repository_url> is your private registry reachable by OCP or Internal OCP registry. 
Otherwise, if you want to use Podman and Buildah command linesee the related commands to use in the README file. 
 
## Deploying IBM Workload Scheduler Operators by using the OpenShift command line: 
Before deploying the IBM Workload Scheduler components, you need to perform some configuration steps for the WA_IBM-workload-automation Operator: 

1. 
create workload-automation dedicated project using the OPC command line, as follows:        
   oc new-project workload-automation 
2. create the WA_ IBM-workload-automation operator service account:       
   oc create -f deploy/WA_ IBM-workload-automation-operator_service_account.yaml 
3. 
create the WA_ IBM-workload-automation operator role: 
   oc create -f deploy/ WA_ IBM-workload-automation-operator_role.yaml 
4. 
create the WA_ IBM-workload-automation operator role binding: 
   oc create -f deploy/ WA_ IBM-workload-automation-operator_role_binding.yaml  
5. 
create the WA_ IBM-workload-automation operator custom resources definition: 
   oc create -f deploy/crds/ WA_ IBM-workload-automation-operator_custome_resource_definition.yaml 
 
## Installing the operator 
We do not have the Operator Lifecycle Manager (OLM) installed, so we performed the following steps to install and configure 
 the operator: 
 
 1. In the Operator structure that we have shown you before, open the `deploy` folder. 
2. Open the ` WA_ IBM-workload-automation_operator.yaml` file in a flat text editor. 
 3. Replace every occurrence of the `REPLACE_IMAGE` string with the following string: `<repository_url>/<wa-package>-operator:9.5.0.02` where <repository_url> is the repository you can select before to push images. 
 4. Finally, install the operator, by running the following command:  
      oc create -f deploy_ IBM-workload-automation _operator.yaml 
 
Note:  
If you have the Operator Lifecycle Manager (OLM) installed, see how to configure the Operator in the README file. 
 
Now we have the WA operator installed iour OCP 4.4 cloud environment, as you can see in the following picture: 
Fig 1. OCP dashboard – Installed Operators view 
##Deploy the WA server, console and agent components instances in OCP 

1. 
Select the installed WA Operator and go to the YAML section to set the parameter values that you need to install the server, console, and agent instances: 

​2. 
Choose the components to be deployed, by setting them on true: 
3. 
4. In this article, we are going to deploy all components, so we set all values on true.Set the number of pod replicas to be deployed for each component: 

​5.

In this example you leave the default. In this article, we decided to set replicaCount to 2 for each component. 
  1. Accept the license by setting it to accept. 
 
After all changes have been performed, go to the WA Operator section and select Create WorkloadAutomationProd”, 
Fig 2. OCP dashboard – Installed Operators - IBM Workload Automation Operator instance view 
When the action is completed, you can see the number of running WA pods that is the same one selected in the YAML file 
for server, console and agent components: 
Fig 3. OCP dashboard –Workload – Running pods for workload-automation project. 
Scheduling - Scale UP and DOWN instances number  
Thanks to the Operator feature, you can decide to scale up or down each component just simply going to the installed WA operator, and modifying the “replicaCount” value number in the YAML file related to the instance you previously created. 

Saving the change performed on the YAML file, the Operator automatically updates the number of instances accordingly to the value you set for each component.
 

​In this article we show you how we scaled up the 
wa-agent instances from 2 to 3, by increasing the replicaCount value, as you can see in the following picture: 
Fig 4. OCP dashboard – Modify Installed Operators YAML file for workload-automation project. 
After a simple “Save action”, you can immediately see the updated number of running pod instances, as you can see in the following picture: 
Fig 5. OCP dashboard –Workload – Pods view for workload-automation-jade project. 
Note:  
You can repeat the same scenario for the master domain manager and Dynamic Workload Console. The elastic scheduling makes the deployment implementation 10x faster and 10x more scalable also for the main components. 
 
Monitoring WA resources to improve Quality of Service by using OCP dashboard console 
Last but not least, you can monitor the WA resources by using OCP native dashboard or going in drill-down on the Grafana dashboard. In this way, you can understand the resource usage of each WA component, collect resource usage and performance across WA resources to correlate implication of usage to performance, and scale up or down WA component number to improve overall components throughput and improve Quality of Service (QoS).  

So, you can understand if the number of WA instances you deployed can support your daily scheduling, otherwise you can increase the instances number. Furthermore, you can understand if you need to adequate the WA console instances number to support the simultaneous multiple users access, that is already empowered by the load balance action provided by OCP cloud 

In our example, after having scaled up the replicaCount to 3, we realized that 2 instances were sufficient to have a good performance in our daily scheduling. Thus, we decreased the instance to 2 to not exceed the available resource quotas. 

​The following pictures show you the scaling down from 3 to 2 instances: 
Fig 6OCP dashboard (workload automation namespace) 
The following picture shows a drill-down on the Grafana dashboard of a defined range of time in which we scaled down from 3 to 2 server instances. 
Fig 7. Grafana dashboard - CPU Usage and quota for wa-waserver instance in workload automation namespace 
Fig 8. Grafana dashboard - Memory Usage and Quota for wa-waserver instance in workload automation namespace 
Fig 9. Grafana dashboard - Network Usage and Receive bandwith  for wa-waserver instance in workload automation namespace 
Fig 10. Grafana dashboard - Network Average Container Bandwith by pod -Received and Transmitted for wa-waserver instance in workload automation namespace 

Author's BIO
Serena Girardini, Workload Automation Test Technical Leader 

Serena Girardini is the System Verification Test Team leader for the Workload Automation product in distributed environments. She joined IBM in 2000 as a Tivoli Workload Scheduler developer and she was involved in the product relocation from San Jose Lab to Rome Lab during a short term assignement in San Jose (CA).  For 14 years, Serena gained experience in Tivoli Workload Scheduler distributed product suite as developer, customer support engineer, tester and information developer. She covered for a long time the role of L3 fixpack releases Test Team Leader and in this period she was a facilitator during critical situations and upgrade scenarios at customer site. In her last 4 years at IBM she became IBM Cloud Resiliency and Chaos Engineering Test Team Leader. She joined HCL in April, 2019 as expert Tester for IBM Workload Automation product suite and she was recognized as Test Leader for the product porting to the most important Cloud offerings in the market. She has a math bachelor degree.
Federico Yusteenappar, Workload Automation Junior Software Developer 

He joined HCL in September 2019 as Junior Software Developer starting to work as Cloud Developer for IBM Workload Automation product suite. My main activity was thextension of the Workload Automation product from a Kubernetes native environment to OpenShift Container Platform. He has a Computer Engineering master degree.   

How to Automate SAP HANA Lifecycle Management in Workload Automation

$
0
0
Before knowing about our plugin use cases and how it benefits to our Workload Automation users, let us have little insight about what is SAP HANA LCM Cloud Platform. 

SAP Cloud Platform (SCP) is a platform-as-a-service (PaaS) product that provides a development and runtime environment for cloud applications. Based in SAP HANA in-memory database technology, and using open source and open standards, SCP allows independent software vendors (ISVs), startups and developers to create, deploy and test HANA-based cloud applications. 
SAP uses different development environments, including Cloud Foundry and Neo, and provides a variety of programming languages. 

Neo is a feature-rich and easy-to-use development environment, allowing you to develop, deploy and monitor Java, SAP HANA XS, and HTML5 applications.  

SAP HANA LCM plugin can automate and orchestrate some of the deploy and monitor functionalities of Java application like state, start, stop, delete, redeploy. 

Let’s see what our plugin does. 

Log in to the Dynamic Workload Console and open the Workload Designer. Choose to create a new job and select “SAP HANA Cloud Platform Application Lifecycle” job type in the ERP section. 
Select the General tab and specify the required details like Folder, Name, and Workstation  
Establishing connection to the SAP HANA Cloud Platform:  
In the connection tab we need to specify the input parameters like Hostname, Port, Account name and Account credentials to let workload Automation interact with SAP HANA cloud and click Test Connection. A confirmation message is displayed when the connection is established. Certification and Retry options are optional fields. 
In Action tab specify the Application Name and perform the action based on the requirement, we have different kind of actions here like State, Start, Stop and Re-Deploy and Delete 

State: It will present the current state of application  
Start: Start the application  
Stop: Stop the application 
Re-Deploy: Update application/binaries parameters and upload one or more binaries. 
Delete: Delete the application 
 
Click Search button, opens a popup containing application list. Select the application form Application List.  On click of Details button additional parameters gets displayed for the selected application. 
Select the job type which you want to perform and submit a job to job stream. 
Select Redeploy action perform redeploy. On select of redeploy action the additional parameters get enabled. Browse WAR file location on click of Browse button and provide Runtime Name, Runtime Version, Compute Unit size and Number of processes.
  
On click of Retrieve button the additional parameters for the selected application gets auto populated. We can modify those values. 
Compression MIME Types and Compression Min. Size are required only when Response compression is “on”. 
Submitting your job: 
  
It is time to Submit your job into the current plan. You can add your job to the job stream that automates your business process flow. Select the action menu in the top-left corner of the job definition panel and click on Submit Job into Current Plan. A confirmation message is displayed, and you can switch to the Monitoring view to see what is going on.  
Track/Monitor your Job:  
 
You can also easily monitor the submitted job in WA by navigating to “Monitor Workload” page.  
Select the job and click on job log option to view the logs of SAP HANA Cloud job. Here you can see the application state like started or stopped. 
Extra Information:  
You can see that there are few “Extra properties” provided by the plug-in which you can use these variables for the next job submission.  
Therefore, SAP HANA LCM plugin in Workload Automation is best fit for those who are looking for deploy and  monitor their java application like start, stop, delete and redeploy. It enables you to start or stop the application and delete the application and redeploy it. 

Are you curious to try out the SAP HANA LCM plugin? Download the integrations from the Automation Hub and get started or drop a line at santhoshkumar.kumar@hcl.com. 

Author's BIO
Dharani Ramalingam -Senior Java Developer at HCL Technologies 
 
Works as a Plugin Developer in Workload Automation. Technology enthusiast who loves to learn new tools and technologies. Acquired skills on Java, Spring, Spring Boot, Microservices, ReactJS, NodeJS, JavaScript, Hibernate. 
 
Arka Mukherjee, Quality Analyst at HCL Technologies 
 
Working as Quality Analyst for the Workload Automation team in HCL Software, Bangalore. Worked both in manual and automation test scenarios across various domains 

Case Study : RESTFUL Booking Application through Workload Automation

$
0
0
This Blog aims to showcase a Case Study on how Truck Bookings can be made on a  RESTFul Application developed in Python and how Vendors can respond to the Request through Booking Confirmations made through RESTFul Calls completely trigerred and managed through Workload Automation. 
We have a REST API Program developed in Python using Flaskrunning in the background on a Server ,the data is stored on a Mongo DB and this API can process the below types of queries : 
  1. Get Requests made against it to retrieve the list of Booking Requests made on the Application. 
  2. Get Request to retrieve a Particular Booking Request made against the Application. 
  3. Post Requests made against it to make fresh Truck Bookings on the RESTFul Application. 
So, in order to retrieve the list of bookings from such an Application , the company plans to use Workload Scheduler , the get action is defined as a RESTFul Job using the RESTFul Job Type , the job is defined as follows , the Service URL in the Job would be the link which is being hit in the Application , this would be a GET Method Type Job , you would also be filling out the User ID and Password or have Certificate Based Authentication using a keystore Path and password to hit the Service URL in the Authentication tab : 
The job when executed would send a JSON Response in the Joblog output as shown below with a listing of all Booking Requests made : 
Job                                                   RESTFUL_GET_ALLBOOKINGS 
Workstation (Job)                            AGENT 
Job Stream                                      JOBS 
Workstation (Job Stream)               AGENT 

=============================================================== 
= JOB       : AGENT#JOBS[(0330 05/25/20),(CF20145AAAAAAAAD)].RESTFUL_GET_ALLBOOKINGS 
= TASK      : <?xml version="1.0" encoding="UTF-8"?> 
<jsdl:jobDefinition xmlns:jsdl="http://www.ibm.com/xmlns/prod/scheduling/1.0/jsdl" xmlns:jsdlrestful="http://www.ibm.com/xmlns/prod/scheduling/1.0/jsdlrestful" name="RESTFUL"> 
  <jsdl:variables> 
    <jsdl:stringVariable name="tws.jobstream.name">JOBS</jsdl:stringVariable> 
    <jsdl:stringVariable name="tws.jobstream.id">JOBS</jsdl:stringVariable> 
    <jsdl:stringVariable name="tws.job.name">RESTFUL_GET_ALLBOOKINGS</jsdl:stringVariable> 
    <jsdl:stringVariable name="tws.job.workstation">AGENT</jsdl:stringVariable> 
    <jsdl:stringVariable name="tws.job.iawstz">202005250330</jsdl:stringVariable> 
    <jsdl:stringVariable name="tws.job.promoted">NO</jsdl:stringVariable> 
    <jsdl:stringVariable name="tws.job.resourcesForPromoted">10</jsdl:stringVariable> 
    <jsdl:stringVariable name="tws.job.num">850043560</jsdl:stringVariable> 
  </jsdl:variables> 
  <jsdl:application name="restful"> 
    <jsdlrestful:restful> 
<jsdlrestful:RestfulParameters> 
<jsdlrestful:Authentication> 
<jsdlrestful:credentials> 
<jsdl:userName/> 
<jsdl:password>{aes}MvwiATDb+mZbkSTdrSBDb8AAolOo3TwNhrlCxC9a1Iw=</jsdl:password> 
</jsdlrestful:credentials> 
<jsdlrestful:CertificateGroup> 
<jsdlrestful:keyStoreFilePath/> 
<jsdlrestful:password/> 
<jsdlrestful:HostnameVerifyCheckbox/> 
</jsdlrestful:CertificateGroup> 
</jsdlrestful:Authentication> 
<jsdlrestful:RESTAction> 
<jsdlrestful:URI>http://127.0.0.1:5000/api/v1/resources/requests/all</jsdlrestful:URI> 
<jsdlrestful:method>GET</jsdlrestful:method> 
<jsdlrestful:outputFileName/> 
 
</jsdlrestful:RESTAction> 
<jsdlrestful:Body> 
<jsdlrestful:contentType>application/json</jsdlrestful:contentType> 
<jsdlrestful:BodyGroup> 
<jsdlrestful:FileBody> 
<jsdlrestful:InputFileName/> 
</jsdlrestful:FileBody> 
</jsdlrestful:BodyGroup> 
</jsdlrestful:Body> 
<jsdlrestful:Advanced> 
 
<jsdlrestful:Accept/> 
<jsdlrestful:JSONPropertiesGroup> 
<jsdlrestful:JsonObjectResultQuery/> 
</jsdlrestful:JSONPropertiesGroup> 
<jsdlrestful:NumberOfRetries>0</jsdlrestful:NumberOfRetries> 
<jsdlrestful:RetryIntervalSeconds>30</jsdlrestful:RetryIntervalSeconds> 
</jsdlrestful:Advanced> 
</jsdlrestful:RestfulParameters> 
</jsdlrestful:restful> 
  </jsdl:application> 
  <jsdl:resources> 
    <jsdl:orderedCandidatedWorkstations> 
      <jsdl:workstation>3646FC79FFB046588013F5C87F3F0A4A</jsdl:workstation> 
    </jsdl:orderedCandidatedWorkstations> 
  </jsdl:resources> 
</jsdl:jobDefinition> 
= TWSRCMAP  :  
= AGENT     : AGENT 
= Job Number: 850043560 
= Mon 05/25/2020 15:08:07 IST 
=============================================================== 
{ 
  "result": [ 
    { 
      "Date": "05/25/2020",  
      "Destination": "Mumbai",  
      "Source": "Bengaluru",  
      "Time": "10:00PM",  
      "Type": "5 Ton(17 ft)",  
      "id": 2 
    },  
    { 
      "Date": "05/25/2020",  
      "Destination": "Mumbai",  
      "Source": "Bengaluru",  
      "Time": "10:00PM",  
      "Type": "5 Ton(17 ft)",  
      "id": 2 
    },  
    { 
      "Date": "05/25/2020",  
      "Destination": "Mumbai",  
      "Source": "Bengaluru",  
      "Time": "10:00PM",  
      "Type": "5 Ton(17 ft)",  
      "id": 2 
    } 
  ] 
} 
 
 
=============================================================== 
= Exit Status           : 0 
= Elapsed Time (hh:mm:ss) : 00:00:01 
= Mon 05/25/2020 15:08:07 IST 
=============================================================== 
 
Likewise when a New Booking Request is made , a job is executed in the Background which would post the New Booking Request to the Mongo DB .  

The Job defined would include the Service URL of the Application and the Method selected as “POST” . The form filled in a Booking Portal is passed in the form of JSON Input and the Job posts this against the Mongo DB : 
Job                                                           RESTFUL_POST_TRUCKBOOKING 
Workstation (Job)                                    AGENT 
Job Stream                                              JOBS 
Workstation (Job Stream)                       AGENT 
=============================================================== 
= JOB       : AGENT#JOBS[(0330 05/26/20),(JOBS)].RESTFUL_POST_TRUCKBOOKING 
= TASK      : <?xml version="1.0" encoding="UTF-8"?> 
<jsdl:jobDefinition xmlns:jsdl="http://www.ibm.com/xmlns/prod/scheduling/1.0/jsdl" xmlns:jsdlrestful="http://www.ibm.com/xmlns/prod/scheduling/1.0/jsdlrestful" name="RESTFUL"> 
  <jsdl:variables> 
    <jsdl:stringVariable name="tws.jobstream.name">JOBS</jsdl:stringVariable> 
    <jsdl:stringVariable name="tws.jobstream.id">JOBS</jsdl:stringVariable> 
    <jsdl:stringVariable name="tws.job.name">RESTFUL_POST_TRUCKBOOKING</jsdl:stringVariable> 
    <jsdl:stringVariable name="tws.job.workstation">AGENT</jsdl:stringVariable> 
    <jsdl:stringVariable name="tws.job.iawstz">202005260330</jsdl:stringVariable> 
    <jsdl:stringVariable name="tws.job.promoted">NO</jsdl:stringVariable> 
    <jsdl:stringVariable name="tws.job.resourcesForPromoted">10</jsdl:stringVariable> 
    <jsdl:stringVariable name="tws.job.num">850044088</jsdl:stringVariable> 
  </jsdl:variables> 
  <jsdl:application name="restful"> 
    <jsdlrestful:restful> 
<jsdlrestful:RestfulParameters> 
<jsdlrestful:Authentication> 
<jsdlrestful:credentials> 
<jsdl:userName/> 
<jsdl:password>{aes}zmbgqdnW6ZCRQwb8vv7DepBfs731FXNJXPzJ913t0/8=</jsdl:password> 
</jsdlrestful:credentials> 
<jsdlrestful:CertificateGroup> 
<jsdlrestful:keyStoreFilePath/> 
<jsdlrestful:password/> 
<jsdlrestful:HostnameVerifyCheckbox/> 
</jsdlrestful:CertificateGroup> 
</jsdlrestful:Authentication> 
<jsdlrestful:RESTAction> 
<jsdlrestful:URI>http://127.0.0.1:5000/api/v1/resources/requests</jsdlrestful:URI> 
<jsdlrestful:method>POST</jsdlrestful:method> 
<jsdlrestful:outputFileName/> 
 
</jsdlrestful:RESTAction> 
<jsdlrestful:Body> 
<jsdlrestful:contentType>application/json</jsdlrestful:contentType> 
<jsdlrestful:BodyGroup> 
<jsdlrestful:TextBody> 
<jsdlrestful:InputTextBody/> 
</jsdlrestful:TextBody> 
</jsdlrestful:BodyGroup> 
</jsdlrestful:Body> 
<jsdlrestful:Advanced> 
 
<jsdlrestful:Accept/> 
<jsdlrestful:JSONPropertiesGroup> 
<jsdlrestful:JsonObjectResultQuery/> 
</jsdlrestful:JSONPropertiesGroup> 
<jsdlrestful:NumberOfRetries>0</jsdlrestful:NumberOfRetries> 
<jsdlrestful:RetryIntervalSeconds>30</jsdlrestful:RetryIntervalSeconds> 
</jsdlrestful:Advanced> 
</jsdlrestful:RestfulParameters> 
</jsdlrestful:restful> 
  </jsdl:application> 
  <jsdl:resources> 
    <jsdl:orderedCandidatedWorkstations> 
      <jsdl:workstation>3646FC79FFB046588013F5C87F3F0A4A</jsdl:workstation> 
    </jsdl:orderedCandidatedWorkstations> 
  </jsdl:resources> 
</jsdl:jobDefinition> 
= TWSRCMAP  :  
= AGENT     : AGENT 
= Job Number: 850044088 
= Tue 05/26/2020 10:08:38 IST 
=============================================================== 
POST Successful 
 
=============================================================== 
= Exit Status           : 0 
= Elapsed Time (hh:mm:ss) : 00:00:01 
= Tue 05/26/2020 10:08:38 IST 
=============================================================== 
 
Inorder to retrieve a booking for a Booking ID , a job would be run which would get a Truck Booking Application passing the ID in the Service URL as follows , this would be a RESTFUL GET Job as shown below : 
Job                                                                  RESTFUL_GET_TRUCKINFO 
Workstation (Job)                                           AGENT 
Job Stream                                                     JOBS 
Workstation (Job Stream)                              AGENT 
=============================================================== 
= JOB       : AGENT#JOBS[(0330 05/26/20),(JOBS)].RESTFUL_GET_TRUCKINFO 
= TASK      : <?xml version="1.0" encoding="UTF-8"?> 
<jsdl:jobDefinition xmlns:jsdl="http://www.ibm.com/xmlns/prod/scheduling/1.0/jsdl" xmlns:jsdlrestful="http://www.ibm.com/xmlns/prod/scheduling/1.0/jsdlrestful" name="RESTFUL"> 
  <jsdl:variables> 
    <jsdl:stringVariable name="tws.jobstream.name">JOBS</jsdl:stringVariable> 
    <jsdl:stringVariable name="tws.jobstream.id">JOBS</jsdl:stringVariable> 
    <jsdl:stringVariable name="tws.job.name">RESTFUL_GET_TRUCKINFO</jsdl:stringVariable> 
    <jsdl:stringVariable name="tws.job.workstation">AGENT</jsdl:stringVariable> 
    <jsdl:stringVariable name="tws.job.iawstz">202005260330</jsdl:stringVariable> 
    <jsdl:stringVariable name="tws.job.promoted">NO</jsdl:stringVariable> 
    <jsdl:stringVariable name="tws.job.resourcesForPromoted">10</jsdl:stringVariable> 
    <jsdl:stringVariable name="tws.job.num">850044087</jsdl:stringVariable> 
  </jsdl:variables> 
  <jsdl:application name="restful"> 
    <jsdlrestful:restful> 
<jsdlrestful:RestfulParameters> 
<jsdlrestful:Authentication> 
<jsdlrestful:credentials> 
<jsdl:userName/> 
<jsdl:password>{aes}3pIZo56cOJkT3Ri+IpkgVHu75fXyGr+0RGqh3tYiVTc=</jsdl:password> 
</jsdlrestful:credentials> 
<jsdlrestful:CertificateGroup> 
<jsdlrestful:keyStoreFilePath/> 
<jsdlrestful:password/> 
<jsdlrestful:HostnameVerifyCheckbox/> 
</jsdlrestful:CertificateGroup> 
</jsdlrestful:Authentication> 
<jsdlrestful:RESTAction> 
<jsdlrestful:URI>http://127.0.0.1:5000/api/v1/resources/requests?id=0</jsdlrestful:URI> 
<jsdlrestful:method>GET</jsdlrestful:method> 
<jsdlrestful:outputFileName/> 
 
</jsdlrestful:RESTAction> 
<jsdlrestful:Body> 
<jsdlrestful:contentType>application/json</jsdlrestful:contentType> 
<jsdlrestful:BodyGroup> 
<jsdlrestful:FileBody> 
<jsdlrestful:InputFileName/> 
</jsdlrestful:FileBody> 
</jsdlrestful:BodyGroup> 
</jsdlrestful:Body> 
<jsdlrestful:Advanced> 
 
<jsdlrestful:Accept/> 
<jsdlrestful:JSONPropertiesGroup> 
<jsdlrestful:JsonObjectResultQuery/> 
</jsdlrestful:JSONPropertiesGroup> 
<jsdlrestful:NumberOfRetries>0</jsdlrestful:NumberOfRetries> 
<jsdlrestful:RetryIntervalSeconds>30</jsdlrestful:RetryIntervalSeconds> 
</jsdlrestful:Advanced> 
</jsdlrestful:RestfulParameters> 
</jsdlrestful:restful> 
  </jsdl:application> 
  <jsdl:resources> 
    <jsdl:orderedCandidatedWorkstations> 
      <jsdl:workstation>3646FC79FFB046588013F5C87F3F0A4A</jsdl:workstation> 
    </jsdl:orderedCandidatedWorkstations> 
  </jsdl:resources> 
</jsdl:jobDefinition> 
= TWSRCMAP  :  
= AGENT     : AGENT 
= Job Number: 850044087 
= Tue 05/26/2020 10:07:02 IST 
=============================================================== 
[ 
  { 
    "Date": "05/20/2020",  
    "Destination": "Chennai",  
    "Source": "Mumbai",  
    "Time": "08:00AM",  
    "Type": "4 Ton(14 ft)",  
    "id": 0 
  } 
] 
 
 
=============================================================== 
= Exit Status           : 0 
= Elapsed Time (hh:mm:ss) : 00:00:01 
= Tue 05/26/2020 10:07:02 IST 
=============================================================== 
 
The JSON Response retrieved can be viewed in the Joblog as shown above.
 
In order to commit on a Truck Booking Request on the Portal, the Vendor willing to fulfill the Request would confirm the booking Details and a Commitment Time of the request , RESTFul application running in the background as below would serve to fulfill the same : 
A job called RESTFUL_TRUCKINFO_COMMITMENT would get called which would be calling the URL http://127.0.0.1:5000/api/v1/resources/commitments to confirm the Booking, this would be a RESTFUL Post Type Job which would as shown below: 
The Joblog of this job execution would be as follows : 
Job                                                                          RESTFUL_TRUCKINFO_COMMITMENT 
Workstation (Job)                                                   AGENT 
Job Stream                                                             JOBS 
Workstation (Job Stream)                                      AGENT 
=============================================================== 
= JOB       : AGENT#JOBS[(0330 05/25/20),(CF20145AAAAAAAAD)].RESTFUL_TRUCKINFO_COMMITMENT 
= TASK      : <?xml version="1.0" encoding="UTF-8"?> 
<jsdl:jobDefinition xmlns:jsdl="http://www.ibm.com/xmlns/prod/scheduling/1.0/jsdl" xmlns:jsdlrestful="http://www.ibm.com/xmlns/prod/scheduling/1.0/jsdlrestful" name="RESTFUL"> 
  <jsdl:variables> 
    <jsdl:stringVariable name="tws.jobstream.name">JOBS</jsdl:stringVariable> 
    <jsdl:stringVariable name="tws.jobstream.id">JOBS</jsdl:stringVariable> 
    <jsdl:stringVariable name="tws.job.name">RESTFUL_TRUCKINFO_COMMITMENT</jsdl:stringVariable> 
    <jsdl:stringVariable name="tws.job.workstation">AGENT</jsdl:stringVariable> 
    <jsdl:stringVariable name="tws.job.iawstz">202005250330</jsdl:stringVariable> 
    <jsdl:stringVariable name="tws.job.promoted">NO</jsdl:stringVariable> 
    <jsdl:stringVariable name="tws.job.resourcesForPromoted">10</jsdl:stringVariable> 
    <jsdl:stringVariable name="tws.job.num">850044094</jsdl:stringVariable> 
  </jsdl:variables> 
  <jsdl:application name="restful"> 
    <jsdlrestful:restful> 
<jsdlrestful:RestfulParameters> 
<jsdlrestful:Authentication> 
<jsdlrestful:credentials> 
<jsdl:userName/> 
<jsdl:password>{aes}+6ud69aC05miii+GX9AepE1U3XM8AZ7bvXjmV8CMZwA=</jsdl:password> 
</jsdlrestful:credentials> 
<jsdlrestful:CertificateGroup> 
<jsdlrestful:keyStoreFilePath/> 
<jsdlrestful:password/> 
<jsdlrestful:HostnameVerifyCheckbox/> 
</jsdlrestful:CertificateGroup> 
</jsdlrestful:Authentication> 
<jsdlrestful:RESTAction> 
<jsdlrestful:URI>http://127.0.0.1:5000/api/v1/resources/commitments</jsdlrestful:URI> 
<jsdlrestful:method>POST</jsdlrestful:method> 
<jsdlrestful:outputFileName/> 
 
</jsdlrestful:RESTAction> 
<jsdlrestful:Body> 
<jsdlrestful:contentType>application/json</jsdlrestful:contentType> 
<jsdlrestful:BodyGroup> 
<jsdlrestful:TextBody> 
<jsdlrestful:InputTextBody/> 
</jsdlrestful:TextBody> 
</jsdlrestful:BodyGroup> 
</jsdlrestful:Body> 
<jsdlrestful:Advanced> 
 
<jsdlrestful:Accept/> 
<jsdlrestful:JSONPropertiesGroup> 
<jsdlrestful:JsonObjectResultQuery/> 
</jsdlrestful:JSONPropertiesGroup> 
<jsdlrestful:NumberOfRetries>0</jsdlrestful:NumberOfRetries> 
<jsdlrestful:RetryIntervalSeconds>30</jsdlrestful:RetryIntervalSeconds> 
</jsdlrestful:Advanced> 
</jsdlrestful:RestfulParameters> 
</jsdlrestful:restful> 
  </jsdl:application> 
  <jsdl:resources> 
    <jsdl:orderedCandidatedWorkstations> 
      <jsdl:workstation>3646FC79FFB046588013F5C87F3F0A4A</jsdl:workstation> 
    </jsdl:orderedCandidatedWorkstations> 
  </jsdl:resources> 
</jsdl:jobDefinition> 
= TWSRCMAP  :  
= AGENT     : AGENT 
= Job Number: 850044094 
= Tue 05/26/2020 10:38:26 IST 
=============================================================== 
POST Successful 
 
=============================================================== 
= Exit Status           : 0 
= Elapsed Time (hh:mm:ss) : 00:00:01 
= Tue 05/26/2020 10:38:27 IST 
=============================================================== 
 
The Successful Post would create a New Commitment in a table in the MongoDB for the Application. 

​Snippet of the type of Application running in the Background against which the IWS jobs are run , the below Implementation can be extended and made more complex as desired : 

Authors's Bio
Sriram V, Tech Sales, HCL Technologies 

I’ve been working with Workload Automation for the last 11 years in various capacities like WA Administrator , SME , India-SME , later joined the Product team supporting Workload Automation on SaaS, recently moved to Tech Sales and Lab Services of Workload Automation. 

Agents and Reports: Oracle Business Intelligence, A step ahead with Workload Automation

$
0
0
Are you familiar with Automation Hub! It is the time. 

Data! We have enough data to process.
 

Analyze! We have multiple 
software and algorithms to analyze and process the data. 

Question is how to represent or publish the processed data together as a report. 
There are few which do this favor. 

But, will the generated reports be flexible for reuse? Will the report maintenance be easy? Will they have an optimized data extraction and data generation process?
 

​Answer
ing is tough. Because it is not easy to maintain and produce efficient reports from huge data consistently with an ease. 
Big fishes like Oracle, IBM will have the trick to satisfy the customer with the required features. 
There comes our plugin OBI Run Report to answer all the queries with minimal effort which is associated with Oracle BI publisher. This can be combined with the workload automation tool by the users. 

Yes, reports are generated and published with the requirements. How to reach them to the customers. Simple answer is by using agents. Agents can deliver the reports to the customers based on the trigger events and the targets. Targets can be different, in other way, the delivery routes can be varying by multiple conditions and requirements. 

Agents are triggered by schedules or conditions that in turn generates a request to perform analytics on data based upon defined criteria, which can be used for reports scheduling as well as alerts sent to the required recipients on different web accessible / communication devices. 

Agents also provide proactive delivery of real-time, personalized, and actionable intelligence throughout the business network. 

​As a next block of feature, we introduce OBI agent which help to satisfy the requirement. This plugin shares the features with Oracle iBot/agent in all aspects and they are part of session-based web services and associated with workload automation. 
 
Technical description and workflow

OBI Run Report plugin 
Defined from the business use case that Oracle BI publisher provide pixel-perfect published reporting solution for enterprise reporting needs and customers can create BI Publisher reports using host of features provided in the Report Designer to suit their requirements. 

With OBI Run Report plugin they can run a specific report in the BI Publisher Server and save the generated report to defined location. 
 
Prerequisite for the plugins to work: 
-OBIEE 12C or above installation 
 
 
BI Publisher reports can be generated in 2 ways by this plugin.  
  – On OBI server  
  – On Agent Workstation  
 
For both the cases must provide the path for report generation. 
 
Log in to the Dynamic Workload Console and open the Workload Designer. Choose to create a new job and select “Oracle Business Intelligence Run Report” job type in the ERP section: 
Establishing connection to the OBI server: 
In the connection tab provide hostname, port and credential of the server. 
A connection message is displayed when the connection is established. 
Required Run Report Absolute path and format 
Submitting the job stream: 
Track/ monitor the submitted job: 
You can easily monitor the  submitted  job  in WA through navigating to “Monitor Workload” page.  
Logs for the OBI server report creation: 
Generated report can be saved as different formats. The report looks like this: 
Report generation for OBI agent workstation: 
Submit the job stream with absolute path and format: 
Track/Monitor the job via “Monitor workload” page: 
Log for the OBI agent workstation: 
OBI agent plugin 

iBot or agent (OBIEE) 

software-based intelligent agents utility used for reports scheduling as well as Alerts sent to the required recipients on different web accessible/communication devices. Used to access, filter, perform analysis on data and that execute requests and generate responses to the appropriate people and devices. 

Elements contains: - 
  – Priority and visibility 
  – Conditional request 
  – Schedule 
  – Recipients 
  – Delivery content 
  – Destination 

​The agent can be event-based or scheduled and provide constant monitoring and intelligence spanning operational and business intelligence sources. 
 
Architecture: - 

OBIEE (Oracle Business Intelligence Enterprise Edition) 
Business Intelligence (BI) is tool by Oracle Corporation which has a prove architecture and common infrastructure producing and delivering enterprise reports, scorecards, dashboards, ad-hoc analysis, predictive alerts, notifications and OLAP analysis provides a rich end-user experience. 
Components of OBIEE. 
 
Prerequisite for the plugins to work:  
- Oracle Business Intelligence 12c (12.2.1.4.0) 
- Oracle Database 12c 
- Oracle Fusion middleware12c (12.2.1.4.0) 
- Credentials and roles for user to establish a connection with OBI Server and run OBI Agent. 
 
For more details, use the official Oracle Documentation 
 
https://docs.oracle.com/middleware/bi12214/biee/index.html 
https://docs.oracle.com/cd/E17904_01/bi.1111/e10541/deliversconfigset.htm#BIESG1360 
 
Log in to the Dynamic Workload Console and open the Workload Designer. Choose to create a new job and select “Oracle Business Intelligence Run Report” job type in the ERP section: 
Establishing connection to the OBI server: 
In the connection tab provide hostname, port and credential of the server 
A connection message is displayed when the connection is established. 
path of the agent created by user in OBIEE 

Track/ monitor the submitted job: 
You can also easily monitor the submitted job in WA through navigating to “Monitor Workload” page.  
Logs for the agent creation  
Agent properties 
Alert window for the agents. 
Data is endless. Best way to oversee them ifinding a friend who handle it with ease and wise. 

Workload automation can help you for what you are looking at. 

​D
rop a mail at santhoshkumar.kumar@hcl.com for details on the plugins. 


Author's Bio
Gaurav KulkarniTechnical Specialist at HCL Software 

Experience in Java technologies like Hibernate, Spring boot, Web Services and REST APIs, UI technologies like native JavaScript, jQuery, ReactJS, python flask, Databases like Postgres, Oracle. Enthusiast about full stack software development and other similar technologies. 
Akhilesh Chandra, Developer at HCL Software 
 
Java Developer, Experience in Cross Domain, Working Experience in Spring framework, Spring Boot, web services, Core java, J2EE and Database. 
Interested in artificial intelligence, python, machine learning and data science. 
Rooparani Karuti – Senior Test Specialist at HCL Software 
 
Working as senior test specialist for wo Workload Automation team in HCL Software, Bangalore. Worked both in manual and automation test scenarios across various domains.

HCL AUTOMATION POWER SUITE BUNDLE TO AUTOMATE MORE, BETTER AND SMARTER

$
0
0
HCL Software announced the introduction of HCL Automation Power Suite bundle offering comprising of HCL Workload Automation, HCL Clara and HCL HERO. With Automation Power Suite, customers can automate more, automate better and automate smarter to build an enterprise automation platform.   
Introducing the most powerful automation offering that has best products, processes, practices and price together! 
 
  • HCL Workload Automation: Seamlessly orchestrate business-critical processes against business KPIs, from a centralized point of control across platforms (from mainframe to containers).  
 
  • HCL Clara The Intelligent Virtual Assistant, enhancing Workload Automation customers’ experience with natural language processing interactions and smart actions. 
 
  • HCL HERO HEalthcheck & Runbook Optimizer (HERO) is the IT Administrator’s best friend that, leveraging Machine Learning & Big Data, assists the Administrators in optimizing Workload Automation's infrastructure.  
 
  • Automation HubA marketplace to expand the automation capabilities of modern digital enterprises to new domains with a collection of cutting-edge integrations - available on the Automation Hub catalog - covering a wide spectrum of automation needs, from IT tasks to business processes. 
 
 Get ease of use with HCL Automation Power Suite. Want to know how, discover the benefits:  
 
HCL WORKLOAD AUTOMATION 

A digital transformation booster  
HCL Workload Automation helps you automate beyond the boundaries, supporting multiple platforms, providing an advanced integration with enterprise applications such as SAP (Workload Automation is HANA S/4 certified), Oracle, Salesforce, and more, as well as with cloud resources, database/ETL management and more. Simplify and standardize the connection and orchestration of workloads from and to business intelligence and data processing applications with 50+ out-of-the-box plugins available on the Automation Hub and 100+ supported technologies.  

Lowest TCO on the market  
Stop worrying about costs, start enjoying all of the Workload Automation features. 
There are no hidden costs: you buy HCL Workload Automation we give you the whole suite of plugins to easily connect activities and resources from common ERPs, Clouds, Databases, APIs, plus an all-inclusive product license with advanced capabilities and multiplatform support.  

Simplify and control complexity  
HCL Workload Automations allows you to easily design the dynamic resolution of complex applications interdependencies in heterogeneous ecosystems. Schedulers and Operators love it for its flexibility and Executives feels safer with a robust long-time market leader technology that takes care of the organization business continuity. 
 
HCL CLARA 

HCL Clara offers a human-like, personalized, round-the-clock experience to Workload Automation users, which will:  
  • Minimize the FAQ-type calls  
  • Speed up learning curve on new features  
  • Reduce common-issue repetitive incidents  
  • Promote best practices 

SIMPLE TO GET STARTED 
Learn how to use various functions and work-arounds, and get your actions done on Workload Automation in simple conversations at your convenience with HCL Clara. 

Manage How-To Questions  
  • Get me started with building my process (jobs, APIs.. 
  • How to use calendar or event-based scheduling 
  • Understand new features 
  • Semantic search in Product Documentation 

Support Basics Scheduling Scenarios  
  • Submit a job or job stream  
  • Re-run jobs  
  • Check job status and push notification for job status changes 
  • High risk critical jobs 
  • Download job log  

Troubleshoot Workload  
  • Why the job is not starting?  
  • Why it failed?  
  • Why the job stuck in ready/ hold state? 
  • Why the job is still running? 
  • Why the job is in abend? 

HCL HERO 

HCL HERO brings the benefits of Artificial Intelligence (AI) technology to customers. 
By providing an automated, intelligent solution to monitor the health of your Workload Automation environments, HCL HERO frees up IT Administrator’s time and reduces manual effort: 

Out-of-the-box Monitors and Runbooks  
  • Eliminate the need to manually maintain custom monitor scripts 
  • Open platform to integrate predefined custom monitor scripts and Runbooks 

Prediction on KPIs trends  
  • Provide actual KPIs, such as throughput and queue monitoring  
  • Provide AI-powered trend estimation of KPIs to predict potential problems 

Failure Prevention  
  • Provide intuitive dashboard with warnings and errors prioritization and email notifications  
  • Control internal queues exhaustion before system hangs  

Achieve Optimum Performance  
  • Get insights on your infrastructure weaknesses  
  • Monitor critical agent availability 
  • Plan resources allocation 
 
HCL Software Automation Power Suite offers perpetual pricing modelContacts us at HWAinfo@hcl.com 
 
For more information, visit https://hcltechsw.com/products/automationpowersuite or tune into the
​ 
Automation Series | Podcast 

Author's BIO
Emanuela Zaccone, Workload Automation Product Manager 
An experienced product manager with a strong digital marketing and digital entrepreneurship background. As Digital Entrepreneur she founded TOK.tv in 2012, reaching more than 40 million sports fans in the world before selling the company to the Minerva Networks Group in 2019. In the same year, she granted the inventor title by patenting social TV.  She completed a PhD between the universities of Bologna (Italy) and Nottingham (UK).   
Marco Cardelli - Workload Automation Product Manager
Marco has been working with IBM since 1990 and on IBM Workload Scheduler for z/OS since 1995. He started on IBM Workload Scheduler for z/OS as a L3 support specialist and then joined the development team as chief designer starting with IBM Workload Scheduler for z/OS 8.3. In 2015 he became architect of the IBM Workload Scheduler for z/OS product. In September 2016, as part of the new partnership agreement between IBM and HCL, he moved to the new HCL Products & Platforms division. Since January 2017 he left the development team and joined the Workload Automation Offering team.
Ernesto Carrabba, Product Manager, HCL HERO and HCL Clara​
Ernesto Carrabba is the Product Manager both for HCL HERO and HCL Clara. Ernesto is a very dynamic product manager with experience in building and launching IoT products, combined with a master’s degree in Mechanical Engineering and study researches on Augmented and Virtual Reality.

Unleash the power of HCL Workload Automation in an Amazon EKS cluster

$
0
0
Don’t get left behind! The new era of digital transformation of businesses has moved on tonew operating models such as containers and cloud orchestration. 

Let’s find out how to get the best of Workload Automation (WA) by deploying the solution on a cloud-native environment such as Amazon Elastic Kubernetes Service (Amazon EKS).
This type of deployment makes the WA topology implementation 10x easier, 10x faster, and 10x more scalable compared to the same deployment in an on-premises classical platform. ​  

In an Amazon EKS deployment, to best fit the cloud networking needs of your company, you can select the appropriate networking cloud components supported by the WHelm chart to be used for the server and console components:  
  • Load balancers  
  • Ingresses  

Y
ou can also leverage the Grafana monitoring tool to display WA performance data and metrics related to the server and console application servers (WebSphere Application Server Liberty Base). Grafana needs to be installed manually on Amazon EKS to have access to Grafana dashboards. Metrics provide drill-down for the state, health, and performance of your WA deployment and infrastructure. 

In this blog you can 
discover how to: 
  • Deploy WA components (Server, Agent, Console) in an Amazon EKS cluster, using one of the available cloud network configurations. 
  • Download the Kubernetes job plug-in from the Automation Hub website and configure it in your AWS EKS cloud environment.  
  • Monitor the WA solution from the WA customized Grafana Dashboard. 

 
Let’s start by taking a tour!!! 

Deploy WA components (Server, Agent, Console) in an Amazon EKS cluster, using one of the available network configurations 


In this 
example, we set up the following topology for the WA environment and we configure the use of the ingress network configuration for the server and console components:  
  • server  
  • 2 dynamic agents  
  • 1 console 

Let’s
 demonstrate how you can roll out the deployment without worrying about thecomponent installation process. 

For more 
information about the complete procedure, see: 
https://github.com/WorkloadAutomation/hcl-workload-automation-chart OR https://github.com/WorkloadAutomation/ibm-workload-automation-chart/blob/master/README.md 
  1. Create hwa-test namespace for the Workload Automation environment 

2. Add the Helm chart to the repo 
Add the Workload Automation chart to your repo and then pull it on your machine 


3. Customize the Helm Chart values.yaml file 
Extract the package from the HCL or IBM Entitled Registry, as explained in the README fileand open the values.yaml Helm chart file. The values.yaml file contains the configurable parameters for the WA components. 
To deploy 2 Agents in the same instance, set the waagent replicaCount parameter to 2
Snap of replicaCount parameter from the values.yaml file
Set the Console exposeServiceType as Ingress as follows:
Snap of console Ingress configuration parameters from the values.yaml file
Set the server exposeServiceType as Ingress as follows:
Snap of server Ingress configuration parameters from the values.yaml file
Save the changes in the values.yaml file and get ready to deploy the WA solution 

4. Deploy the WA environment configuration  
Now it’s time to deploy the configuration. From the directory where the values.yaml file is located, run: 
After about ten minutes, the WA environment is deployed and ready to use! 

No other configurations or settings are needed, you can start to get the best of the WA solution in the AWS EKS cluster!   
To work with the WA scheduling and monitoring functions, you can use the console as usual,or take advantage of the composer/conman command lines by accessing the WA master pod. 

To figure out how to get the WA console URL, continue to read this article!
Workload Automation component pod view from the Kubernetes Manager tool Lens
Install and configure the Automation Hub Kubernetes plug-in 

Let’s start to explore how to install and configure the native Kubernetes jobs on the AWS EKS environment.  
NOTE: These installation steps are also valid for any other Plugin available in the AutomationHub catalog. 
To download the Kubernetes Batch Job Plugin 9.5.0.02 version, go to the following Automation Hub URL:
Workload Automation Kubernetes Batch Job plugin in Automation Hub  
  1. Download the package from Automation Hub and extract it to your machine
Download the package from Automation Hub and extract it to your machine
2. Copy the JAR file in the DATA_DIR folder of your WA master pod 
From the directory where you extracted the plug-in content, log in to your AWS EKS cluster, and run the command: 
3. Copy the JAR file in the applicationJobPlugin folder 
Access the master pod and copy the Kubernetes JAR file from the /home/wauser/wadata/wa-plugin folder to the applicationJobPlugin folder.
Copy command from the Server pod terminal
4. Restart the application server  
From the appservertools folder in TWS inst directory run the commands 
Workload Automation application server start/stop commands.
Now the plugin is installed, and you can start creating Kubernetes job definitions from the Dynamic Workload Console.  
5. Create and submit the job  
To access the Dynamic Workload Console, you need the console ingress address. You can find it running the command:
Kubernetes command to get the list of ingress addresses. 
Build up the URL of the console by copying the ingress address, as follows:
From the Workload Designer create a new Kubernetes job definition:
Job definition search page from the Dynamic Workload Console. 
Define the name of the job and workstation where the job runs:
Job definition page of the Dynamic Workload Console. 
On the Connections page, check the connection to your cluster:
Connection panel of the Kubernetes Batch Job plugin in the Dynamic Workload Console 
From the Run Kubernetes Job page, specify the name of the Kubernetes job yaml file that you have defined on your workstation. 
Kubernetes job configuration page of Workload Automation console 
Now there’s nothing left to do but save the job and submit it to run!!! 
 As expected, the k8s job runs on a new pod deployed under the hwa-test namespace:
Kubernetes Batch job pod view from Kubernetes Manager tool Lens. 

Once the job is done, the pod is automatically terminated.  

Monitor the WA environment through the customized Grafana Dashboard 


Now that your environment is 
running and you get how to install and use the plugins, you can monitor the health and performance of your WA environment. 

Use
 the metrics that WA has reserved for you!!! 

To get
 a list of all the amazing WA metrics  available, see the Metric Monitoring section of the readme: https://github.com/WorkloadAutomation/hcl-workload-automation-chart 

​Log
 in to the WA custom Grafana Dashboard, and access one of the following available custom metrics:
List of Workload Automation custom metrics from the Grafana dashboard  
In each section, discover a brand-new way to monitor the health of your environment!
Workload Automation custom metrics from the Grafana dashboard – Pod resources 
Take a look at the space available for your WA persistent volumes for WA DATA_DIR!
Workload Automation custom metrics from the Grafana dashboard  Disk usage
Full message queues are just an old memory! 
Workload Automation custom metrics from the Grafana dashboard – Message queue 
For an installation process example check this out!
Learn more about Workload Automation and get in touch with us here!
Author's Bio
Serena Girardini
She is the Verification Test manager for the Workload Automation product in distributed environments. She joined IBM in 2000 as a Tivoli Workload Scheduler developer and she was involved in the product relocation from the San Jose Lab to the Rome Lab during a short-term assignment in San Jose (CA).  For 14 years, Serena gained experience in Tivoli Workload Scheduler distributed product suite as adeveloper, customer support engineer, tester and information developer. She covered for a long time the role of L3 fix pack release Test Team Leader and, in this period, she was a facilitator during critical situations and upgrade scenarios at customer sitesIn her last 4 years at IBM, she became IBM Cloud Resiliency and Chaos Engineering Test Team Leader. She rejoined HCL in April, 2019 as an expert Tester and she was recognized as Test Leader for the product porting to the most important Cloud offerings in the market. She has a Bachelor Degree in Mathematics.
Louisa Ientile
Louisa works as an Information Developer planning, designing, developing, and maintaining customer-facing technical documentation and multimedia assets.  Louisa completed her degree at University of Toronto, Canada, and currently lives in Rome, Italy. 
Davide Malpassini
He joined HCL in September 2019 as Technical Lead starting to work on IBM Workload Automation product suite. He has 14 years experience on software development and his activity was the extension of the Workload Automation product from a Kubernetes native environment to OpenShift Container Platform and  REST API for Engine of Workload Automation . He has a Computer Engineering Master Degree.
Pasquale Peluso
He is Workload Automation Software Engineer. He joined HCL in September 2019 in the Verification Test team. He works as verification tester for Workload Automation suite on distributed and cloud-native environments. He has a master’s degree in Automation Engineering.
Filippo Sorino 
He joined HCL in September 2019 as Junior Software Developer starting to work as Tester for IBM Workload Automation product suite.  He has a computer engineering bachelor’s degree.
Federico Yusteenappar
He joined HCL in September 2019 as Junior Software Developer starting to work as Cloud Developer for IBM Workload Automation product suite. Hismain activity was the extension of the Workload Automation product from a Kubernetes native environment to OpenShift Container Platform. He has a Computer Engineering Master Degree.

Case Study: SAP Factory Calendar Import with HCL Workload Automation

$
0
0
This blog aims to show how SAP Calendar Import could be done through Workload Automation. Workload Automation as a product has ready made integration with SAP since the 90’s leveraging the SAP RFC Libraries of SAP using the SAP R/3 Batch Access Method. 

Now , we would see how we can use this same access method to import Freeday Calendars or Workday Calendars from an SAP R/3 System into Workload Automation.
The r3batch access method can be invoked from TWS/methods Directory(in the older versions) or from the TWSDATA/methods directory in the Newer versions . The export can be for both Freeday Calendars as well as Workday Calendars. The below example is an export of a Freeday Calendar referenced by the Factory Calendar ID 02 exported into a text file /tmp/calendar_03.dat with the name HLI : 

wauser@wa-server:/opt/wa/TWS/methods$ ./r3batch -t RSC -c S4HANAR3BW — ” –calendar_id 02 –year_from 2020 –year_to 2021 –tws_name HLI –getfreedays -filename ‘/tmp/calendar_03.dat’ “ 
Tue Mar 10 09:48:58 2020 
-t RSC represents that the import is for an RFC SAP Calendar. 
-c CalendarName represents that the Calendar name which is imported from the specific SAP System. 
calendar_id XX denotes a 2 Character identifier of the SAP R/3 Calendar to be imported. 
year_from XXXX denotes the Start year from which to start exporting the dates. 
year_to XXXX denotes the End Year upto which you can export dates. 
getfreedays indicates that the export is for Freedays. 
-filename ‘<PATH>/CalendarFileName indicates the name of the file to which export is to be done on the Host OS where you are issuing the command. 

The exported Calendar can be viewed in the File as shown below :
 
wauser@wa-server:/opt/wa/TWS/methods$ cat /tmp/calendar_03.dat 
$CALENDAR 
HLI 
  “” 
  01/01/2020 01/04/2020 01/05/2020 01/11/2020 01/12/2020 01/18/2020 01/19/2020 
  01/25/2020 01/26/2020 02/01/2020 02/02/2020 02/08/2020 02/09/2020 02/15/2020 
  02/16/2020 02/22/2020 02/23/2020 02/29/2020 03/01/2020 03/07/2020 03/08/2020 
  03/14/2020 03/15/2020 03/21/2020 03/22/2020 03/28/2020 03/29/2020 04/04/2020 
  04/05/2020 04/10/2020 04/11/2020 04/12/2020 04/13/2020 04/18/2020 04/19/2020 
  04/25/2020 04/26/2020 05/01/2020 05/02/2020 05/03/2020 05/09/2020 05/10/2020 
  05/16/2020 05/17/2020 05/21/2020 05/23/2020 05/24/2020 05/30/2020 05/31/2020 
  06/01/2020 06/06/2020 06/07/2020 06/13/2020 06/14/2020 06/20/2020 06/21/2020 
  06/27/2020 06/28/2020 07/04/2020 07/05/2020 07/11/2020 07/12/2020 07/18/2020 
  07/19/2020 07/25/2020 07/26/2020 08/01/2020 08/02/2020 08/08/2020 08/09/2020 
  08/15/2020 08/16/2020 08/22/2020 08/23/2020 08/29/2020 08/30/2020 09/05/2020 
  09/06/2020 09/12/2020 09/13/2020 09/19/2020 09/20/2020 09/26/2020 09/27/2020 
  10/03/2020 10/04/2020 10/10/2020 10/11/2020 10/17/2020 10/18/2020 10/24/2020 
  10/25/2020 10/31/2020 11/01/2020 11/07/2020 11/08/2020 11/14/2020 11/15/2020 
  11/21/2020 11/22/2020 11/28/2020 11/29/2020 12/05/2020 12/06/2020 12/12/2020 
  12/13/2020 12/19/2020 12/20/2020 12/24/2020 12/25/2020 12/26/2020 12/27/2020 
  12/31/2020 01/01/2021 01/02/2021 01/03/2021 01/09/2021 01/10/2021 01/16/2021 
  01/17/2021 01/23/2021 01/24/2021 01/30/2021 01/31/2021 02/06/2021 02/07/2021 
  02/13/2021 02/14/2021 02/20/2021 02/21/2021 02/27/2021 02/28/2021 03/06/2021 
  03/07/2021 03/13/2021 03/14/2021 03/20/2021 03/21/2021 03/27/2021 03/28/2021 
  04/02/2021 04/03/2021 04/04/2021 04/05/2021 04/10/2021 04/11/2021 04/17/2021 
  04/18/2021 04/24/2021 04/25/2021 05/01/2021 05/02/2021 05/08/2021 05/09/2021 
  05/13/2021 05/15/2021 05/16/2021 05/22/2021 05/23/2021 05/24/2021 05/29/2021 
  05/30/2021 06/05/2021 06/06/2021 06/12/2021 06/13/2021 06/19/2021 06/20/2021 
  06/26/2021 06/27/2021 07/03/2021 07/04/2021 07/10/2021 07/11/2021 07/17/2021 
  07/18/2021 07/24/2021 07/25/2021 07/31/2021 08/01/2021 08/07/2021 08/08/2021 
  08/14/2021 08/15/2021 08/21/2021 08/22/2021 08/28/2021 08/29/2021 09/04/2021 
  09/05/2021 09/11/2021 09/12/2021 09/18/2021 09/19/2021 09/25/2021 09/26/2021 
  10/02/2021 10/03/2021 10/09/2021 10/10/2021 10/16/2021 10/17/2021 10/23/2021 
  10/24/2021 10/30/2021 10/31/2021 11/06/2021 11/07/2021 11/13/2021 11/14/2021 
  11/20/2021 11/21/2021 11/27/2021 11/28/2021 12/04/2021 12/05/2021 12/11/2021 
  12/12/2021 12/18/2021 12/19/2021 12/24/2021 12/25/2021 12/26/2021 12/31/2021 
 
The exported Calendar in the text file can be imported into Workload Automation using a composer add as shown below :
 

HCL Workload Automation(UNIX)/COMPOSER 9.5.0.01 (20190703) 
Licensed Materials – Property of IBM* and HCL** 
5698-WSH 
(C) Copyright IBM Corp. 1998, 2016 All rights reserved. 
(C) Copyright HCL Technologies Ltd. 2016, 2019 All rights reserved. 
* Trademark of International Business Machines 
** Trademark of HCL Technologies Limited 
Installed for user “wauser“. 
Locale LANG set to the following: “en 
User: wauser, Host:127.0.0.1, Port:31116 
User: wauserHost:localhost, Port:31114 
/ 
-add /tmp/calendar_03.dat 
AWSJCL003I The command “add” completed successfully on object “cal=HLI”. 
AWSBIA302I No errors in /tmp/calendar_03.dat. 
AWSBIA288I Total objects updated: 1 
wauser@wa-server:/opt/wa/TWS/methods$ 

So, with the above Steps a Factory 
Freeday Calendar with ID 02 was imported Successfully into Workload Automation under the name HLI . 

The below example is an export of a Factory Workday Calendar referenced by the WorkdayCalendar ID 02 exported into a text file /tmp/calendar_02.dat with the name NEW : 
wauser@wa-server:/opt/wa/TWS/methods$ ./r3batch -t RSC -c S4HANAR3BW — ” –calendar_id 02 –year_from 2020 –year_to 2021 –tws_name NEW –tws_description ‘SAP Calendar 02’ –getworkdays -filename ‘/tmp/calendar_02.dat’ “ 
Tue Mar 10 09:43:43 2020 

The exported Calendar can be displayed and viewed as follows 
: 
wauser@wa-server:/opt/wa/TWS/methods$ cat /tmp/calendar_02.dat 
$CALENDAR 
NEW 
  “SAP Calendar 02” 
  01/02/2020 01/03/2020 01/06/2020 01/07/2020 01/08/2020 01/09/2020 01/10/2020 
  01/13/2020 01/14/2020 01/15/2020 01/16/2020 01/17/2020 01/20/2020 01/21/2020 
  01/22/2020 01/23/2020 01/24/2020 01/27/2020 01/28/2020 01/29/2020 01/30/2020 
  01/31/2020 02/03/2020 02/04/2020 02/05/2020 02/06/2020 02/07/2020 02/10/2020 
  02/11/2020 02/12/2020 02/13/2020 02/14/2020 02/17/2020 02/18/2020 02/19/2020 
  02/20/2020 02/21/2020 02/24/2020 02/25/2020 02/26/2020 02/27/2020 02/28/2020 
  03/02/2020 03/03/2020 03/04/2020 03/05/2020 03/06/2020 03/09/2020 03/10/2020 
  03/11/2020 03/12/2020 03/13/2020 03/16/2020 03/17/2020 03/18/2020 03/19/2020 
  03/20/2020 03/23/2020 03/24/2020 03/25/2020 03/26/2020 03/27/2020 03/30/2020 
  03/31/2020 04/01/2020 04/02/2020 04/03/2020 04/06/2020 04/07/2020 04/08/2020 
  04/09/2020 04/14/2020 04/15/2020 04/16/2020 04/17/2020 04/20/2020 04/21/2020 
  04/22/2020 04/23/2020 04/24/2020 04/27/2020 04/28/2020 04/29/2020 04/30/2020 
  05/04/2020 05/05/2020 05/06/2020 05/07/2020 05/08/2020 05/11/2020 05/12/2020 
  05/13/2020 05/14/2020 05/15/2020 05/18/2020 05/19/2020 05/20/2020 05/22/2020 
  05/25/2020 05/26/2020 05/27/2020 05/28/2020 05/29/2020 06/02/2020 06/03/2020 
  06/04/2020 06/05/2020 06/08/2020 06/09/2020 06/10/2020 06/11/2020 06/12/2020 
  06/15/2020 06/16/2020 06/17/2020 06/18/2020 06/19/2020 06/22/2020 06/23/2020 
  06/24/2020 06/25/2020 06/26/2020 06/29/2020 06/30/2020 07/01/2020 07/02/2020 
  07/03/2020 07/06/2020 07/07/2020 07/08/2020 07/09/2020 07/10/2020 07/13/2020 
  07/14/2020 07/15/2020 07/16/2020 07/17/2020 07/20/2020 07/21/2020 07/22/2020 
  07/23/2020 07/24/2020 07/27/2020 07/28/2020 07/29/2020 07/30/2020 07/31/2020 
  08/03/2020 08/04/2020 08/05/2020 08/06/2020 08/07/2020 08/10/2020 08/11/2020 
  08/12/2020 08/13/2020 08/14/2020 08/17/2020 08/18/2020 08/19/2020 08/20/2020 
  08/21/2020 08/24/2020 08/25/2020 08/26/2020 08/27/2020 08/28/2020 08/31/2020 
  09/01/2020 09/02/2020 09/03/2020 09/04/2020 09/07/2020 09/08/2020 09/09/2020 
  09/10/2020 09/11/2020 09/14/2020 09/15/2020 09/16/2020 09/17/2020 09/18/2020 
  09/21/2020 09/22/2020 09/23/2020 09/24/2020 09/25/2020 09/28/2020 09/29/2020 
  09/30/2020 10/01/2020 10/02/2020 10/05/2020 10/06/2020 10/07/2020 10/08/2020 
  10/09/2020 10/12/2020 10/13/2020 10/14/2020 10/15/2020 10/16/2020 10/19/2020 
  10/20/2020 10/21/2020 10/22/2020 10/23/2020 10/26/2020 10/27/2020 10/28/2020 
  10/29/2020 10/30/2020 11/02/2020 11/03/2020 11/04/2020 11/05/2020 11/06/2020 
  11/09/2020 11/10/2020 11/11/2020 11/12/2020 11/13/2020 11/16/2020 11/17/2020 
  11/18/2020 11/19/2020 11/20/2020 11/23/2020 11/24/2020 11/25/2020 11/26/2020 
  11/27/2020 11/30/2020 12/01/2020 12/02/2020 12/03/2020 12/04/2020 12/07/2020 
  12/08/2020 12/09/2020 12/10/2020 12/11/2020 12/14/2020 12/15/2020 12/16/2020 
  12/17/2020 12/18/2020 12/21/2020 12/22/2020 12/23/2020 12/28/2020 12/29/2020 
  12/30/2020 01/04/2021 01/05/2021 01/06/2021 01/07/2021 01/08/2021 01/11/2021 
  01/12/2021 01/13/2021 01/14/2021 01/15/2021 01/18/2021 01/19/2021 01/20/2021 
  01/21/2021 01/22/2021 01/25/2021 01/26/2021 01/27/2021 01/28/2021 01/29/2021 
  02/01/2021 02/02/2021 02/03/2021 02/04/2021 02/05/2021 02/08/2021 02/09/2021 
  02/10/2021 02/11/2021 02/12/2021 02/15/2021 02/16/2021 02/17/2021 02/18/2021 
  02/19/2021 02/22/2021 02/23/2021 02/24/2021 02/25/2021 02/26/2021 03/01/2021 
  03/02/2021 03/03/2021 03/04/2021 03/05/2021 03/08/2021 03/09/2021 03/10/2021 
  03/11/2021 03/12/2021 03/15/2021 03/16/2021 03/17/2021 03/18/2021 03/19/2021 
  03/22/2021 03/23/2021 03/24/2021 03/25/2021 03/26/2021 03/29/2021 03/30/2021 
  03/31/2021 04/01/2021 04/06/2021 04/07/2021 04/08/2021 04/09/2021 04/12/2021 
  04/13/2021 04/14/2021 04/15/2021 04/16/2021 04/19/2021 04/20/2021 04/21/2021 
  04/22/2021 04/23/2021 04/26/2021 04/27/2021 04/28/2021 04/29/2021 04/30/2021 
  05/03/2021 05/04/2021 05/05/2021 05/06/2021 05/07/2021 05/10/2021 05/11/2021 
  05/12/2021 05/14/2021 05/17/2021 05/18/2021 05/19/2021 05/20/2021 05/21/2021 
  05/25/2021 05/26/2021 05/27/2021 05/28/2021 05/31/2021 06/01/2021 06/02/2021 
  06/03/2021 06/04/2021 06/07/2021 06/08/2021 06/09/2021 06/10/2021 06/11/2021 
  06/14/2021 06/15/2021 06/16/2021 06/17/2021 06/18/2021 06/21/2021 06/22/2021 
  06/23/2021 06/24/2021 06/25/2021 06/28/2021 06/29/2021 06/30/2021 07/01/2021 
  07/02/2021 07/05/2021 07/06/2021 07/07/2021 07/08/2021 07/09/2021 07/12/2021 
  07/13/2021 07/14/2021 07/15/2021 07/16/2021 07/19/2021 07/20/2021 07/21/2021 
  07/22/2021 07/23/2021 07/26/2021 07/27/2021 07/28/2021 07/29/2021 07/30/2021 
  08/02/2021 08/03/2021 08/04/2021 08/05/2021 08/06/2021 08/09/2021 08/10/2021 
  08/11/2021 08/12/2021 08/13/2021 08/16/2021 08/17/2021 08/18/2021 08/19/2021 
  08/20/2021 08/23/2021 08/24/2021 08/25/2021 08/26/2021 08/27/2021 08/30/2021 
  08/31/2021 09/01/2021 09/02/2021 09/03/2021 09/06/2021 09/07/2021 09/08/2021 
  09/09/2021 09/10/2021 09/13/2021 09/14/2021 09/15/2021 09/16/2021 09/17/2021 
  09/20/2021 09/21/2021 09/22/2021 09/23/2021 09/24/2021 09/27/2021 09/28/2021 
  09/29/2021 09/30/2021 10/01/2021 10/04/2021 10/05/2021 10/06/2021 10/07/2021 
  10/08/2021 10/11/2021 10/12/2021 10/13/2021 10/14/2021 10/15/2021 10/18/2021 
  10/19/2021 10/20/2021 10/21/2021 10/22/2021 10/25/2021 10/26/2021 10/27/2021 
  10/28/2021 10/29/2021 11/01/2021 11/02/2021 11/03/2021 11/04/2021 11/05/2021 
  11/08/2021 11/09/2021 11/10/2021 11/11/2021 11/12/2021 11/15/2021 11/16/2021 
  11/17/2021 11/18/2021 11/19/2021 11/22/2021 11/23/2021 11/24/2021 11/25/2021 
  11/26/2021 11/29/2021 11/30/2021 12/01/2021 12/02/2021 12/03/2021 12/06/2021 
  12/07/2021 12/08/2021 12/09/2021 12/10/2021 12/13/2021 12/14/2021 12/15/2021 
  12/16/2021 12/17/2021 12/20/2021 12/21/2021 12/22/2021 12/23/2021 12/27/2021 
 
The Calendar exported can be imported using a composer add command as follows: 

HCL Workload Automation(UNIX)/COMPOSER 9.5.0.01 (20190703) 
Licensed Materials – Property of IBM* and HCL** 
5698-WSH 
(C) Copyright IBM Corp. 1998, 2016 All rights reserved. 
(C) Copyright HCL Technologies Ltd. 2016, 2019 All rights reserved. 
* Trademark of International Business Machines 
** Trademark of HCL Technologies Limited 
Installed for user “wauser“. 
Locale LANG set to the following: “en 
User: wauser, Host:127.0.0.1, Port:31116 
User: wauserHost:localhost, Port:31114 
/ 
-add /tmp/calendar_02.dat 
AWSJCL003I The command “add” completed successfully on object “cal=NEW“. 
AWSBIA302I No errors in /tmp/calendar_02.dat. 
AWSBIA288I Total objects updated: 1 
wauser@wa-server:/opt/wa/TWS/methods$ 

So, with the above Steps a Factory 
Workday Calendar with ID 02 was imported Successfully into Workload Automation under the name NEW.

​So, 
in this way, you can import any SAP Factory Calendar into Workload Automation easily or import all SAP Calendars needed for managing SAP Jobs, this greatly reduces any efforts needed in replicating SAP Calendars which are already defined on SAP Side to WA Side.
Author's Bio
Sriram V
Sriram is working with Workload Automation for the last 11.5 years. Started out as a Scheduler, later as an Administrator, SME and India SME of the Product. He has been part of the Product Team in the last few years supporting Workload Automation on SaaS before moving to the Tech Sales and Lab Services of WA.

Automate Project Create, Delete & Update with Google Cloud Deployment Manager using Workload Automation

$
0
0
Do you need to create, delete, update a lot of Google Cloud Platform (GCP) projects? Maybe the sheer volume or the need to standardize project operation is making you look for a way to automate project managing. We now have a tool to simplify this process for you.

Workload Automation announcing GCPDeoploymentManager Plugin.
GCPDeoploymentManager Plugin automates the creation and management of Google Cloud resources. You can upload flexible template and configuration files to create and manage your GCP resources, including Compute Engine (i.e., virtual machines), Container Engine, Cloud SQL, BigQuery and Cloud Storage.

You can use GCPDeoploymentManager Plugin to create and manage projects, whether you have ten or ten thousand projects, automating the creation and configuration of your projects with GCPDeployment Manager allows you to manage projects consistently.
Now, you can use GCPDeoploymentManager Plugin from workload automation to create and manage projects
It allows you to specify all the resources needed for your application in a declarative format using yaml. You can parameterize the configuration and allow reuse of common deployment paradigms such as a load balanced, auto-scaled instance group. Treat your configuration as code and perform repeatable deployments.
The user can focus on the set of resources which comprise the application or service instead of deploying each resource separately.
It provides templates that allow the use of building blocks to create abstractions or sets of resources that are typically deployed together (e.g. an instance template, instance group, and auto scaler). These templates can be parameterized to allow them to be used over and over by changing input values to define what image to deploy, the zone in which to deploy, or how many virtual machines to deploy.

  • Prerequisite for the plugins to work:

User should have a service account.
And the service account should have access to the deployment manager and compute engine services.
And their API needs to be enabled.

Log in to the Dynamic Workload Console and open the Workload Designer. Choose to create a new job and select “GCPDeploymentManager” job type in the CLOUD section:
  • Establishing connection to the Google Cloud:
In Connection Tab provide Service Account, and project id
Select Deployment name from Deployment Manager. And perform operations (Create, Delete) with configuration code/file uploading.
  • Track/ monitor the submitted job:
You can easily monitor the submitted job in WA through navigating to “Monitor Workload” page.
Logs for the GCPDeoploymentManager report creation:
  • GCPDeoploymentManager properties
  • GCPDeoploymentManager properties with zone.
Are you curious to try out the GCP Deployment Manager plugin? Download the integrations from the Automation Hub and get started or drop a line at santhoshkumar.kumar@hcl.com.
Author's Bio
Umesh Kumar Mahato, Developer, HCL Software
Experience in Java technologies like Hibernate, Spring boot, NodeJS, Web Services and REST APIs, UI technologies like ReactJS with Redux, context API, Hooks, and Database like Oracle, MongoDB. Enthusiast about full stack software development and other similar technologies.
Dharani Ramalingam -Senior Java Developer at HCL Technologies
Works as a Plugin Developer in Workload Automation. Technology enthusiast who loves to learn new tools and technologies. Acquired skills on Java, Spring, Spring Boot, Microservices, ReactJS,  NodeJS, JavaScript, Hibernate.
Arka Mukherjee, Quality Analyst at HCL Technologies
Working as Quality Analyst for the Workload Automation team in HCL Software, Bangalore. Worked both in manual and automation test scenarios across various domains

How To Make The Most out of ODI plugin in Workload Automation

$
0
0

​​Oracle Data Integrator provides a fully unified solution for building, deploying, and managing complex data warehouses or as part of data-centric architectures in a SOA or business intelligence environment. In addition, it combines all the elements of data integration-data movement, data synchronization, data quality, data management, and data services-to ensure that information is timely, accurate, and consistent across complex systems.
Oracle Data Integrator (ODI) features an active integration platform that includes all styles of data integration: data-based, event-based and service-based. ODI unifies silos of integration by transforming large volumes of data efficiently, processing events in real time through its advanced Changed Data Capture (CDC) framework and providing data services to the Oracle SOA Suite. It also provides robust data integrity control features, assuring the consistency and correctness of data. With powerful core differentiators – heterogeneous E-LT, Declarative Design and Knowledge Modules – Oracle Data Integrator meets the performance, flexibility, productivity, modularity and hot-pluggability requirements of an integration platform.
In order to leverage the benefits out of ODI plugin in workload automation, we have classified in to two categories.
  1. Oracle Data Integrator Scenario
  2. Oracle Data Integrator Load Plan

1. Orace Data Integrator Scenario:

A scenario is the partially-generated code (SQL, shell, etc) for the objects (interfaces, procedures, etc.) contained in a package.

When a component such as an ODI interface or package has been created and tested, you can generate the scenario corresponding its actual state.

Once generated, the scenario’s code is frozen, and all subsequent modifications of the package and/or data models which contributed to its creation will not affect it.

It is possible to generate scenarios for packages, procedures, interfaces or variables. Scenarios generated for procedures, interfaces or variables are single step scenarios that execute the procedure, interface or refresh the variable.

2.Oracle Data Integrator Load Plan:

Oracle Data Integrator is often used for populating very large data warehouses. In these use cases, it is common to have thousands of tables being populated using hundreds of scenarios. The execution of these scenarios must be organized in such a way that the data throughput from the sources to the target is the most efficient within the batch window. Load Plans help the user organizing the execution of scenarios in a hierarchy of sequential and parallel steps for these type of use cases.

​ODI load plan is an executable object in ODI that can contain a hierarchy of steps that can be executed conditionally, in parallel or in series. The leaves of this hierarchy are Scenarios. Packages, interfaces, variables, and procedures can be added to Load Plans for executions in the form of scenarios.

ODI Scenario:

Log in to the Dynamic Workload Console and open the Workload Designer. To create a new job, select “Oracle Data Integrator Scenario” job type in the Cloud section.
Establishing connection to the ODI Studio 12c:

In the connection tab specify the URL, username, password and work repository path of the configuration to let workload Automation interact with ODI and click Test Connection. A confirmation message is displayed when the connection is established.
Create the scenario:

In the Action Tab specify the scenario Details to create the scenarios.
Provide the Scenario name, version, context, log level, session and synchronous details.
Submitting your job:

Submit your job into the current plan. You can add your job to the job stream that automates your business process flow. Select the action menu in the top-left corner of the job definition panel and click on Submit Job into Current Plan. A confirmation message is displayed, and you can switch to the Monitoring view to see what is going on.
Track/Monitor your Job:

You can also easily monitor the submitted job in WA through navigating to “Monitor Workload” page.
Select the job and click on job log option to view the logs of the Oracle Data Integrator Scenario job. Here, you can see that the scenario has been created successfully.
ODI Load Plan: 

Log in to the Dynamic Workload Console and open the Workload Designer. To create a new job, select “Oracle Data Integrator Load plan (9.5.0.02)” job type in the Cloud section.
Establishing connection to the ODI Studio 12c

In the connection tab specify the WSDL URL, username, password and work repository path of the configuration to let workload Automation interact with ODI and click Test Connection. A confirmation message is displayed when the connection is established.
Create the Load Plan: 

In the Action Tab specify the Load Plan details to create the ODI Load Plan.
Provide the Load Plan name, context code, log level details.
Submitting your job:

Submit your job into the current plan. You can add your job to the job stream that automates your business process flow. Select the action menu in the top-left corner of the job definition panel and click on Submit Job into Current Plan. A confirmation message is displayed, and you can switch to the Monitoring view to see what is going on. 
Track/Monitor your Job:

You can also easily monitor the submitted job in WA through navigating to “Monitor Workload” page.
Workflow details ODI Load plan:

Here we can see the Workload scheduler workflow details.
Therefore, ODI Load plan and ODI scenario plugins in Workload Automation is a best fit for those who are looking for executing Load plans and scenarios in the ODI Studio. 

Are you curious to try out the ODI plugin? Download the integrations from the Automation Hub and get started or drop a line at santhoshkumar.kumar@hcl.com
Author's Bio
Rabic Meeran K
Technical Specialist at HCL Technologies

Responsible for developing integration plug-ins for Workload Automation. Hands-on with different programing languages and frameworks like JAVA, JPA, Spring Boot, Microservices, MySQL, Oracle RDBMS, Ruby on Rails, Jenkins, Docker, AWS, C and C++.
Saroj Kumar Pradhan
Senior Developer at HCL Technologies

Responsible for developing integration plug-ins for Workload Automation. Hands-on with different programing languages and frameworks like JAVA, JPA, Spring Boot, Microservices, MySQL, Oracle RDBMS, Ruby on Rails, Jenkins, Docker, AWS, C and C++.
Saket Saurav
Tester(Senior Engineer) at HCL Technologies
Responsible for performing Testing for different plugins for Workload Automation using Java Unified Test Automation Framework. Hands-on experience on Java programming language, Web Services with databases like Oracle and SQL Server.

Workload Automation – Customer-centric approach

$
0
0
A customer-centric company is more than a company that offers good customer service. 

Customer-centric is our HCL Software business philosophy based on putting our customers first and at the core of business in order to provide a positive experience and build long-term relationships.  
In today’s uncertain world, not even the best contract can capture what will change tomorrow. A contract can only convert to business advantage through a value centric relationship. 

In the Workload Automation familywe strongly believe in customer collaboration and we have several programs that helps us to nurture relationship with our customers and involve them in the product design and evolution. 

The Client Advocacy Program is aimed to accelerate customer’s success and to create strategic relationships with HCL’s technical, management and executive leaders. The mission of our Client Advocacy Program is to build a direct relationship with our customers. We really want to be able to hear their voice. 

The User experience (UX) design in HCL is based on the Design Thinking approach, that relies on users to stay in touch with real-world needs. We work with users to design and build the solution to their needs through continuous participation of the same users in the design process. 

We really want to bring the user voice in the product design and development. 

What this actually means? 

We take care of the relationship with each customer, no matter of the program. The programs are often just the first engagement: everything can start from a specific request or by pure chance. 

From the very first meeting with our customer we focus on addressing her/his needs and building trust, no matter if it happens in an Ask the Expert or in a Design Thinking session. 

We have tons of successful stories that have started from a simple question or even complaint. The entire product team takes care of each customer by looking for the subject matter expert to answer each question.  

The Customer Advocates often are the first point of contact in the entire organization. They are the customer best buddythey nurture the relationship with constant interaction. 

Our customers know they can rely on us as a team, not only as a product. 

Sometimes happens that the customer’s requests were about something that is not yet in the product. Then the Customer Advocate invites the customer to take part in Design interviews, ideation session or prototype validation about what our product will be. 

But it also happens that customers that at first were engaged in the Design Thinking program decides to maintain this communication channel open even once the design lifecycle ended and joins the Client Advocacy Program

Relationship beyond the contract for us is not our HCL mantra but it’s a way of being. 

Our users help us to help them and we both grow when our relationship grow. 

We hear the customer voice.  

We bring that voice into the product.  

We make our customers life easier, happy and satisfied. 

Learn more about Workload Automation and get in touch with us here
Author's Details
Ilaria Rispoli – ilaria.rispoli@hcl.com

Enrica Pesare – enrica.pesare@hcl.com 

Accelerate your Cloud Transformation! Take advantage from HCL Workload Automation on AWS Marketplace.

$
0
0
​"You may not be responsible for the situation you are in, but you will become responsible if you do nothing to change it." Cit. Martin Luther King
 
Get ready to accelerate your business by simplifying and automating workloads, improving service level agreements and reducing deployment and management time with your Cloud Transformation!
​Could transformation is now the solution to many questions and customer needs to save costs on IT operations and enable faster time to market for new products and capabilities. 

The real value of cloud transformation is the organization’s new ability to quickly consume the latest technology and rapidly adapt and respond to market needs. 

A business transformation is not complete if the automation of processes is not also managed at both the IT and application levels. 

In this context, HCL Software is a real innovator and leader in the workload automation market with the availability of the HCL Workload Automation (HWA) solution which, integrated with an automation Bot, HCL Clara, provides the answer for a complete orchestration, monitoring and reporting of scheduled batch processes both on-premise and on the Cloud. 
 
To respond to the growing request to make automation opportunities more accessible especially on the Cluod, HCL Workload Automation is now offered on the Amazon Web Services cloud as Amazon Elastic Kubernetes Service (Amazon EKS), a fully managed Kubernetes service with high  security, reliability, and scalability values.

The strength of the innovation that HCL carry out with continuous and long-term investments is based on enabling the adoption of technology by minimizing the Total Cost of Ownership (TCO) and adopting paradigms such as containerization to facilitate product implementation and facilitate the transition on new releases. With the new release of HWA available on the AWS Catalogue, we are proud to enable the digital transformation of our customers with a Cloud-Native platform that adapts to the need to quickly release content for users.

Within just a few minutes, customers can now easily launch an instance to deploy an HCL Workload Automation server with full on-premises capabilities on EKS as container.

Containers are portable and lightweight  execution environments that wrap server application software in a filesystem that includes everything it needs to run. Leveraging this delivery model, we have now eliminated the need to proceed with product install and configuration, providing to our customers a solution that can be easily made available dramatically reducing the TCO of the infrastructure.

HWA is the complete, modern solution for batch and real-time workload management. It enables organizations to gain complete visibility and control over attended or unattended workloads. From a single point of control, it supports multiple platforms and provides advanced integration with enterprise applications including ERP, Business Analytics, File Transfer, Big Data, and Cloud applications. 

Customers can now orchestrate all the processes behind the digital transformation of the company, while taking advantage of the lowest total cost of ownership on the market with the availability of the servers as containers on the AWS Catalogue.
 
The huge investments being done by HCL Technologies on the acceleration of the roadmap of the HCL Workload Automation solution are already resulting in practical facts with the availability of the powerful HCL Workloads Automation on AWS being able to assist Cloud Transformation with solution designed “in the Cloud” and “For the Cloud”.  

The power of the solution  is recognized by the HCL customers who are experiencing and appreciating the benefits of the solution day after day with also a strong collaboration and partnership with the HCL development labs with a Transparent Development model: 
HWA as a product has proved to be robust, reliable and flexible throughout our organisation's recent digital transformation to the Cloud. As a vendor, HCL have encouraged our participation in developing new features which will unlock further value by aligning to our future enterprise strategic goals. 
​(UK, gas distribution company)
HCL Workload Automation is now considered a STRATEGY, an enabler for the control and expansion of the business in the new Digital ERA!

Are you worried about the future of your current IT scheduler? Have you been looking for a future proof IT & Apps Workload Automation solution? HCL Software is here to help you with that.

You can now request a free HCL Workload Automation migration assessment for a cost-effective HWA adoption proposal to help enable your workload automation transformation and initiate your new journey with our passionate and expert team.

Contact HWAinfo@hcl.com to reserve a slot for a 1-1 meeting with our product experts to help you design your workload automation transformation, and get a one-month POC to demonstrate in your environment how to migrate to HCL Workload Automation.

Start now using Amazon Elastic Kubernetes Service (EKS) to run HCL Workload Automation containers on Amazon AWS Marketplace!

Author's Bio
Francesca Curzi
Sales Director (Workload Automation, Security, DevOps) and GTM Head of Italy @HCL Technologies

The power of Ansible inside Workload Automation

$
0
0
Can’t get enough of automating your business processes? We have what you are looking for! 
 
The Ansible plug-in is available on Automation Hub, download it to empower your Workload Automation environment 
 
Adding the Ansible plug-in, you can monitor all your Ansible processes directly from the Dynamic Workload Console. Furthermore, you can schedule when executing the Ansible playbooks, just creating a simple job definition. 
Before starting to use the plug-in, you need to install Ansible on the same machine where the dynamic agent that runs the Ansible job is installed. You also need to setup the SSH protocol to communicate with Ansible. 
 
Let’s demonstrate, through an example, how easy is to patch remote nodes with the Ansible plug-in. 
 
  1. Job definition 
  • First, we need the code to patch the remote nodes, and usually it is written through a yum module in a yaml file. This kind of file is called playbook.yml, and we can add it by using the playbook path field.  In the field we need to enter the absolute path to the playbook.yml file; we can use the Search button to search such path in the dynamic agent's file system. The content of the file is the following: 
 
--- 
- hosts: all 
  name: Update packages 
  tasks: 
    - name: Update 
      yum:  
        name: " {{ module_name }} " 
        state: latest 
 
  • Then we need to valorize the variable module_name as an extra argument to correctly execute the playbook. Thus, in the Environment variables section we insert, for example, module_name in the Name column and an asterisk (*) in the Value column. 
    The asterisk indicates that Ansible will update all modules found on the target machine. 
 
  • Next, we need to specify the remote nodes to which Ansible should connect. The file with the targets' list is called inventory and the Inventory section contains the path to such file (or files, since Ansible can consider multiple inventories at once). The Search inventories button allows to search for such paths in the file system of the dynamic agent, starting from the path written just above the button.  
    We want to update modules on localhost and on a remote machine, so our inventory filcontent is as follows: 
 
[LOCAL] 
localhost ansible_connection=local 
[REMOTE] 
node_name ansible_ssh_user=<username> ansible_ssh_host=<ip> 
 
 
We configured all necessary fields to make Ansible work, but if we want, we can also configure some additional options, such as: 
 
  • Check for unreachable hosts before running: when this option is selected, the plug-in forces Ansible to execute the ping module towards all hosts. If at least one host is unreachable, the plug-in stops and ends in error showing the list of unreachable hosts. If all hosts are reachable, the playbook execution starts. 
 
  • The Inventory content field gives the possibility to write an inventory directly in the job definition, without the need for a file stored in the file system of the dynamic agent. 
 
  • The ansible-playbook command accepts some additional parameters that can be written in the Other parameters field. For example, the --verbose parameter is used to get a more verbose output. 

 2. Monitoring 
While Ansible executes the playbook, the plug-in offers the possibility to monitor in real-time its execution. Such monitor page, called Workflow details, is accessible from the monitor jobs view and contains details of each task that Ansible has executed up to a particular point. Refresh the page to see the updates and click on the showAdditionalInfo button to get more details about a specific task. 
 
Thus, thanks to the Ansible plug-in, you can automate your playbooks and monitor all your processes running on Ansible, all from one place. 
 
On Automation Hub we have this and so many other integrations that will enable you to automate everything you want. 
Automate more, automate better! 
Author's Bio
Maria Ludovica Costagliola, Workload Automation Junior Software Developer

She joined HCL in September 2019 as Junior Software Developer starting to work as Developer for IBM Workload Automation product suite. She has a Computer Engineering Master Degree.   
Agnese Berellini, HCL Workload Automation

Agnese is an enthusiastic information developer from Italy. She likes to analyze new features, describe them and improve her knowledge about technical components. When she doesn’t have to deal with developers and software, she loves spending her time traveling around the world. 

Manage your AWS resources by using AWSCloudFormation with Workload Automation

$
0
0
Let us begin with understanding of AWSCloudformation what it is all about before moving to our AWSCloudformation plugin and how it is benefits to our workload automation users.
AWS CloudFormation provides a common language for you to model and provision AWS and third-party application resources in your cloud environment. AWS CloudFormation allows you to use programming languages or a simple text file to model and provision, in an automated and secure manner, all the resources needed for your applications across all regions and accounts. This gives you a single source of truth for your AWS and third-party resources.

Coming to our AWSCloudformation, below diagram summarizes what is our plugin can perform, so our workload customers can make use of this to simplify their infrastructure management as well as easy to implement changes to infrastructure.
To give more clarity on its benefits let us understand with below example,

For a scalable web application that also includes a back-end database, you might use an Auto Scaling group, an Elastic Load Balancing load balancer, and an Amazon Relational Database Service database instance. Normally, you might use each individual service to provision these resources. And after you create the resources, you would have to configure them to work together. All these tasks can add complexity and time before you even get your application up and running.

Instead, you can create or modify an existing AWS CloudFormation template. A template describes all your resources and their properties. When you use that template to create an AWS CloudFormation stack, AWS CloudFormation provisions the Auto Scaling group, load balancer, and database for you. After the stack has been successfully created, your AWS resources are up and running. You can delete the stack just as easily, which deletes all the resources in the stack. By using AWS CloudFormation, you easily manage a collection of resources as a single unit.

Let us begin with our plugin part with job definition parameters,

Log in to the Dynamic Workload Console and open the Workload Designer. Choose to create a new job and select “AWSCloudFormation” job type in the Cloud section.
Connection

Establishing connection to the AWS Cloud server:

In the connection tab specify the Access Key ID ,Secret Access Key,Region and Role ARN fields to let workload Automation interact AWS Cloud Formation API(s) and click Test Connection. A confirmation message is displayed when the connection is established.

  • Access Key ID: associated to your AWS Cloud Formation account. This attribute is required.
  • Secret Access Key: associated to your AWS Cloud Formation account. This attribute is required.
  • AWS Region: location to which the resources are provisioned and managed. This attribute is required.
  • Role ARN: privileged user role who has access to the AWS Cloud.
Action

In Action tab specify the stack name and stack operation which you want to perform.

  • Stack Name: specify the stack name to be executed. Click the Selectbutton to choose the stack name defined in the AWS console. Select an item from the list, the selected item is displayed in the Stack Name field.
Note: For creating a new stack, you can type the stack name.


  • Stack Operation: select an operation item from the list. The application allows you to create, update, and delete a stack.
  • Create Stack: To create a new stack select this option.
  • Update Stack: To update an existing stack select this option.
  • Delete Stack: To delete an existing stack select this option.
  • Template File Path: the path where the template of the stack defined is located. Click the “Select Template”button to choose the template for the selected stack name defined in the AWS console. Select an item from the list, the selected item is displayed in the Template File Path field.
  • Template File Content: if you do not have a template you can use this field to type the template content for your stack.
Submitting your job

It is time to Submit your job into the current plan. You can add your job to the job stream that automates your business process flow. Select the action menu in the top-left corner of the job definition panel and click on Submit Job into Current Plan. A confirmation message is displayed, and you can switch to the Monitoring view to see what is going on.
Monitor Page
JOB LOG Details
Extra Info/Properties
WorkFlow page
Are you curious to try out the AWSCloudFormation plugin? Download the integrations from the Automation Hub and get started or drop a line at santhoshkumar.kumar@hcl.com.


AUTHOR’S BIO
Rooparani Karuti – Senior Test Specialist at HCL Software
Working as senior test specialist for Workload Automation-Plugin Factory team in HCL Software Lab, Bangalore. Having experience in both manual and automation test scenarios across various domains. ​
Dharani Ramalingam -Senior Java Developer at HCL Technologies
Works as a Plugin Developer in Workload Automation. Technology enthusiast who loves to learn new tools and technologies. Acquired skills on Java, Spring, Spring Boot, Microservices, ReactJS,  NodeJS, JavaScript, Hibernate.
Arka Mukherjee, Quality Analyst at HCL Technologies
Working as Quality Analyst for the Workload Automation team in HCL Software, Bangalore. Worked both in manual and automation test scenarios across various domains.

Simplify The Data Loading Using Oracle UCM and HCM Data Loader plugins with Workload Automation

$
0
0
Customers using Oracle Human Resources Cloud face the challenge of continuous bulk loading of large amounts of data at regular intervals. Oracle Human Resources Cloud provides the tools like HCM Data Loader which address this business use case. Now you can automate data loading into Oracle Human Resources cloud using the Oracle UCM and Oracle HCM Data Loader plugins which leverage the HCM Data Loader for the Workload automationusers.

Business Process automated:
Source:https://docs.oracle.com/en/cloud/saas/human-resources/20a/faihm/introduction-to-hcm-data-loader.html#FAIHM1372446

The above diagram shows the business process automated through these plugins:

This process is divided into 2 steps and hence the 2 plugins:
  1. A .zip file containing .dat files is placed on the Oracle WebCenter Content server. Here the Oracle WebCenter Content server acts as a staging infrastructure for files that are loaded and processed by the HCM Data Loader.
  2. HCM Data Loader imports the data first into its stage tables and then into application tables. Any errors that occur during either the import phase or load phase are reported in the job status and details in job log.


Technical description and workflow
Oracle UCM plugin

The Oracle UCM enables you to stage data files for processing to HCM Data Loader.
It provides easier integration with other business processes by using the Oracle Universal Content Management (UCM) integration.
The Oracle UCM Data Loader automates the process of bulk-loading of data. You can load the data files and monitor them from a single point of control.
The data is uploaded as zip files to Oracle UCM, which is processed by the HCM Data Loader.
This integration helps you save time, resources, and speed up data loading in a secure manner.

Prerequisite for the plugins to work:
– Oracle Human Resources Cloud service account with correct permissions to access File Import and Export task in the Oracle Human Resources Cloud web user interface.
– Credentials (username and password) for Oracle Human Resources Cloud web user interface.

Log in to the Dynamic Workload Console and open the Workload Designer. Choose to create a new job and select “Oracle UCM” job type in the Cloud section:
Establishing connection to the Oracle Cloud:
In the connection tab provide URL, Username and Password.
A connection message is displayed when the connection is established.
Required File path which can be browsed using the Browse button
Submitting the job stream:
Track/ monitor the submitted job:
You can easily monitor the  submitted  job  in WA through navigating to “Monitor Workload” page.
Logs for the Oracle UCM file upload:
UCM File upload status from UI:
Oracle HCM Data Loader plugin

The Oracle HCM Data Loader integration enables you to import and load the data from data files uploaded to Oracle UCM by the Oracle UCM plugin to Oracle Human Resources Cloud.
The plugin internally invokes the importAndLoadData function from the HCMCommonDataLoader web service.
HCM Data Loader decompresses the .zip file and imports individual data lines to its stage tables. In the stage tables, related data lines are grouped to form business objects. Any errors that occur during the import phase are reported on the failed job log.
HCM Data Loader calls the relevant logical object interface method (delivered in product services) to load valid objects to the application tables. Any errors that occur during the load phase are reported on the failed job log.

Prerequisite for the plugins to work:
– Oracle Human Resources Cloud service account with Human Capital Management Integration Specialist job role or privileges to access HCM Data Loader.
– Credentials(username and password) for Oracle Human Resources Cloud web user interface.


Log in to the Dynamic Workload Console and open the Workload Designer. Choose to create a new job and select “Oracle UCM” job type in the Cloud section:
Establishing connection to the Oracle Cloud:
In the connection tab provide URL, Username and Password.
A connection message is displayed when the connection is established.
Required Content ID which is generated by the Oracle UCM plugin
Submitting the job stream:
Track/ monitor the submitted job:
You can easily monitor the  submitted  job  in WA through navigating to “Monitor Workload” page.
Logs for the Oracle HCM Data Loader:
HCM Data Loader import and load status from UI:
Author's BIO
Gaurav Kulkarni, Technical Specialist, HCL Software

Experience in Java technologies like Hibernate, Spring boot, Web Services and REST APIs, UI technologies like native JavaScript, jQuery, ReactJS, python flask, Databases like Postgres, Oracle. Enthusiast about full stack software development and other similar technologies.
Rooparani Karuti – Senior Test Specialist at HCL Software
Working as senior test specialist for Workload Automation-Plugin Factory team in HCL Software Lab, Bangalore. Having experience in both manual and automation test scenarios across various domains. ​

Manage your Automation Anywhere Bot by using Automation Anywhere Bot Runner and Trader Plugin with Workload Automation

$
0
0
​​Let us begin with understanding of Automation Anywhere what it is all about before moving to our Automation Anywhere Bot Runner and Bot Trader plugin and how it is benefits to our workload automation users.
Robotic Process Automation (RPA) is simple—and powerful—automation software enabling you to create your own software robots to automate any business process. Your "bots" are configurable software set up to perform the tasks you assign and control.

RPA bots can learn. They can also be cloned. They help the enterprises to automate the business operations in an agile and cost-effective manner. It's code-free, non-disruptive, non-invasive, and easy
Automation Anywhere consists of 3 core components – Bot Creator, Bot Runner and Control Room
  • Bot Creator: Serves as the development environment. Using a drag and drop method, developers create rule-based automations that will be pushed to the control room, and later into deployment if applicable.
  • Bot Runner: Is what the name implies – it runs robots on dedicated machines. It’s visually similar to the bot creator component, but fundamentally, its primary use is to run robots. The end-to-end status of the bot runner’s execution is reported back to the control room.
  • Control Room: Is essentially the hub for all of RPA robots. Robots can be started, paused, stopped, or scheduled from the control room. Code can be pushed to and retrieved from the control room. This is also where credentials and audit logs can be stored.
​To give more clarity on its benefits let us understand with below example,
 
RPA bot which we create in Automation Anywhere Client is software mimicking human actions—usually repetitive actions like typing an email or doing other clerical type tasks, all these bots are controlled by Automation Anywhere Control Room(server). From Control room we can manage bot run, import, export, monitor, etc. 
 
Instead of AA Control room, you can run or import/export an existing bot by using Automation Anywhere Bot runner and trader plugin with workload Automation. Using Automation Anywhere credentials user can login and can see all the available bots in the server (control room).
For Running a bot user can use Automation Anywhere Bot Runner and for Import or Export a bot from the server user can use Automation Anywhere Bot Trader, you easily manage a collection of bots as a single unit.
 
Let us begin with our plugin part with job definition parameters,
 
Automation Anywhere Bot Trader
 
Log in to the Dynamic Workload Console and open the Workload Designer. Choose to create a new job and select “Automation Anywhere Bot Trader” job type in the ERP section.
 
Connection Tab
 
Establishing connection to the Automation Anywhere server: 
 
Connection Info
Use this section to connect to the AA Bot server.
Hostname -The host name of the AA Bot server.
Port - The default port number where the AA Bot Trader server communicates.
Protocol - The protocol for connecting the AA Bot server. Supported values are http and https. This attribute is required. Default value is http.
 
Basic Authentication
Username - The username to access the AA Bot server.
Password - The password to access the AA Bot server.
Test Connection - Click to verify that the connection to the AA Bot server works correctly.
Action Tab
 
Use this section to define the operations to run the AA Bot server.
Note: Only a user role with access to import, export bots and license to run IQ bots can run the operations.
 
 
Bot Information 
You can either import bots or export bots using this section.
Export Bot
            Select this option to export the bots and its dependent files.
Bot Name – 
Click the Search button to select the bots to be exported. The selected item appears in the Bot Name field.
Export Package Name – 
The name of the package name to be created.
Exclude MetaBots – 
Select this check box to exclude the export of meta bots. The meta bot is a reusable component that can be automatically applied to any robot for use. You can use metabot instead of rewriting redundant code for processes.
Output File Directory – 
Click the Search button to select the source file in the local machine where the bots are saved. The selected item appears in the Output File Directory field.
 
Import Bot
Select this option to import the package and bots and its dependent files to the server.
Bot File
Click the Search button to select the bots to be imported. The selected item appears in the Bot File field.
Overwrite Option
Select an option if the file you are importing already exists.
  • Overwrite: allows you to overwrite the bot file that is imported.
  • Skip: skips the import of any bot file that is available in the server.
  • Abort: cancels the import of a bot file in a package.
Bot File Password (optional)
The password to access the bot file in case it is encrypted.
Submitting your job
​ 
It is time to Submit your job into the current plan. You can add your job to the job stream that automates your business process flow. Select the action menu in the top-left corner of the job definition panel and click on Submit Job into Current Plan. A confirmation message is displayed, and you can switch to the Monitoring view to see what is going on.
Automation Anywhere Bot Runner
 
Log in to the Dynamic Workload Console and open the Workload Designer. Choose to create a new job and select “Automation Anywhere Bot Runner” job type in the ERP section.
Connection Tab
 
Establishing connection to the Automation Anywhere server: 
 
Connection Info
Use this section to connect to the AA Bot server.
Hostname -The host name of the AA Bot server.
Port - The default port number where the AA Bot Trader server communicates.
Protocol - The protocol for connecting the AA Bot server. Supported values are http and https. This attribute is required. Default value is https.
 
Basic Authentication
Username - The username to access the AA Bot server.
Password - The password to access the AA Bot server.
Test Connection - Click to verify that the connection to the AA Bot server works correctly.
Action Tab
Use this section to define the operations to run the bot or manage the bots.
Note: Only a user with "bot runner license" and "run my bot" access will be able to perform the operations.
 
Action Info
Bot - 
Click the Select button to select the bots to be deployed. The selected item appears in the Bot field.
Devices - 
You can search a device by specifying the device name in the filter box. Click the plus (+) sign to add one or more devices. Click (-) sign to remove one or more devices.
Or click the Select button, the available devices will be displayed, you can select the required devices from the list.
Submitting your job
​ 
It is time to Submit your job into the current plan. You can add your job to the job stream that automates your business process flow. Select the action menu in the top-left corner of the job definition panel and click on Submit Job into Current Plan. A confirmation message is displayed, and you can switch to the Monitoring view to see what is going on.
Are you curious to try out the Automation Anywhere plugin? Download the integrations from the Automation Hub and get started or drop a line at santhoshkumar.kumar@hcl.com.
AUTHOR’S BIOS 
 
Shubham Chaurasia - Developer at HCL Software
R​esponsible for developing integration plug-ins for Workload Automation. Hands-on with different programming languages and frameworks like JAVA, JPA, Microservices, MySQL, Oracle RDBMS, AngularJS. 

Way to Manage Your Data Using GCP Cloud Storage with Workload Automation

$
0
0
​Let us begin with understanding of Google Cloud Storage what it is all about before moving to our GCP CloudStorage plugin and how it is benefits to our workload automation users.
 
Cloud Storage is a service for storing your objects in Google Cloud. An object is an immutable piece of data consisting of a file of any format. You store objects in containers called buckets.
After the creation of a project, user can create Cloud Storage bucketsupload objects to buckets, and download objects from buckets. User can also grant permissions to make data accessible to specified members, or - for certain use cases such as hosting a website - accessible to everyone on the public internet.
 
Here is how the Cloud Storage structure can apply to a real-world case:
  • Organization: Your company, called Example Inc., creates a Google Cloud organization called exampleinc.org.
  • Project: Example Inc. is building several applications, and each one is associated with a project. Each project has its own set of Cloud Storage APIs, as well as other resources.
  • Bucket: Each project can contain multiple buckets, which are containers to store your objects. For example, you might create a photos bucket for all the image files your app generates and a separate videos bucket.
  • Object: An individual file Once user upload objects to Cloud Storage, user have fine-grained control over how user can secure and share the data. Here are some ways to secure the data inside Cloud Storage:
  1. Identity and Access Management
  2. Data encryption
  3. Authentication
  4. Bucket Lock
  5. Object Versioning

​Let us begin with our plugin part with job definition parameters,

Log in to the Dynamic Workload Console and open the Workload Designer. Choose to create a new job and select “GCP CloudStorage” job type in the Cloud section.
Connection
 
Establishing connection to the Google Cloud server: 
 
Use this section to connect to the Google Cloud.
Service Account - The service account associated to your GCS account. Click the Select button to choose the service account in the cloud console.
Note: This attribute is required. The service account is the identity of the service, and the service account's permissions control which resources the service can access.
Project ID - The project ID is a unique name associated with each project. It is mandatory and unique for each service account.
Test Connection - Click to verify if the connection to the Google Cloud works correctly.
Action
In Action tab specify the bucket name and operation which you want to perform.
 
  • Bucket Name - Specify the name of the bucket in which the objects are stored. Click the Select button to choose the bucket name defined in the cloud console. 
  • Select Operations - Use this section to either upload or download objects.
  • Upload Object - Click this radio button to upload objects to the console.
  • Object Name - Enter the name of the object to be uploaded or the path of the file stored. Click the Select button to choose the object name defined in the cloud console.
  • Source File(s) - Displays the path of the source file. You can use the filter option to streamline your search.
  • If a file already exists - Select an appropriate option for the application to perform if the uploaded file already exists in the console.
  • Replace - Selecting this option replaces the already existing file in the console.
  • Skip - Selecting this option skips the upload of the selected file in the console.
  • Download Object - Click this radio button to download the objects from the console.
  • Object Name - Enter the name of the object to be downloaded. Click the Select button to choose the object name defined in the cloud console. 
  • GCP Cloud File(s) - Displays the path of the source file. You can use the filter option to streamline your search.
  • Delete from GCS - Select this check box to delete the downloaded object from the google cloud console.
  • File Path - Provide the location to download objects. Click the Select button to choose the destination path.
Submitting your job
​ 
It is time to Submit your job into the current plan. You can add your job to the job stream that automates your business process flow. Select the action menu in the top-left corner of the job definition panel and click on Submit Job into Current Plan. A confirmation message is displayed, and you can switch to the Monitoring view to see what is going on.
 
Monitor Page
Job Log Details
WorkFlow Page
Are you curious to try out the GCP CloudStorage plugin? Download the integrations from the Automation Hub and get started or drop a line at santhoshkumar.kumar@hcl.com.

Author's Bio
Suhas H N – Senior Developer at HCL Software
 
Works as a Plugin Developer in Workload Automation. Acquired skills on Java, Spring, Spring Boot, Microservices, AngularJS, JavaScript.

Creating a File Dependency for a Job Stream using Start Condition

$
0
0
Waiting for a file to arrive before a job can start processing it is the most common and quintessential requirement for any workload automation tool.  Historically, this was done by creating a File dependency using OPENS and Unix tricks to manage wild cards and multiple matching files.  Then Event Driven Workload Automation was introduced where an Event Rule could monitor a file with wild cards and when the condition was satisfied the dependent Job Stream was submitted.  With the advent of the Start Condition feature introduced in version 9.4 Fix Pack 1the event rule file monitor capability is integrated into a Job Stream using the utility, filemonitor.  Another important aspect of this requirement is to pass the name of the matching file to another job in the workflow to process the data contained in the file.   
This article explores this feature and also uses an internal variableListOfFilesFound, to pass the name of the matching file to a successive job in the same Job Stream. 

How to use the Start Condition feature with File Created 

Follow the steps below to create a Start Condition for a Job Stream 
  1. Login to the Dynamic Workload Console  
  2. Navigate to Design à Manage Workload Definitions 
  3. Select Create New à Job Stream 
  4. In the General tab, fill in the Job Stream name and Workstation 
  5. In the Start condition tab, fill in the values in the fields as shown below: 
  • Condition: File created An existing file with a matching name will not satisfy the condition, a new file with a matching name must be created. 
  • Workstation: EEL 
  • File: /tmp/start.cond.*.txt 
  • Output file:/tmp/start.cond.out.txt 
  • Job name:FILE_CREATED  A file monitor job with this name is auto generated. This job iteratively keeps monitoring the file and when satisfied, submits  a new instance of the Job Stream. 
6. Select Create New à Job Definition à UNIX
7. In the General tab, fill in the Job name, Workstation, and Login
8. In the Task tab, enter the following 
​Script name: /bin/echo "File Monitored: ${job:FILE_CREATED.ListOfFilesFound}"
9. Click on Save
10. Select Create New à Job Definition à UNIX
11. In the General tab, fill in the Job name, Workstation, and Login
12. In the Task tab, enter the following 
​Script name: cat /tmp/start.cond.out.txt
13. Click on Save
14. Add the two jobs created earlier to the Job Stream
15. Click on Save
16. The following is the Job Stream definition is composer format.
SCHEDULE EEL#START_COND_JS 
STARTCOND FILECREATED EEL#"/tmp/start.cond.*.txt" INTERVAL 60 
( ALIAS FILE_CREATED RERUN OUTFILE "/tmp/start.cond.out.txt" ) 
:
EEL#FILE_NAME_FROM_VARIABLE
 SCRIPTNAME "/bin/echo \"File Monitored: ${job:FILE_CREATED.ListOfFilesFound}\""
 STREAMLOGON iwadmin
 DESCRIPTION "Retrieve file name in Start Cond from an internal variable, ListOfFilesFound"
 TASKTYPE UNIX
 RECOVERY STOP
 
EEL#FILE_NAME_FROM_OUTPUT_FILE
 SCRIPTNAME "cat /tmp/start.cond.out.txt"
 STREAMLOGON iwadmin
 DESCRIPTION "Retrieve file name in Start Cond from the Output file field"
 TASKTYPE UNIX
 RECOVERY STOP
 FOLLOWS FILE_NAME_FROM_VARIABLE
 
END
17. ​Select the Job Stream Name and choose Select an Action à Submit Job Stream into Current Plan

Monitor the Status of Job Stream with the Start Condition and File Created

Follow the steps below to monitor the status of the Job Stream
  1. Login to the Dynamic Workload Console 
  2. Navigate to Monitoring and Reporting à Monitor Workload
  3. Choose Job Stream for Object Type and click on Run
  4. In the Filter window, enter Start_cond and press Enter
  5. In the resulting view, Right Click on the Job Stream, START_COND_JS, and choose Jobs
  6. Notice that there are 4 jobs in the Job Stream
          FILE_CREATED                                      Auto generated job to keep monitoring the file
          RESTART_STARTCOND                       Auto generated job to submit the Job Stream
          FILE_NAME_FROM_VARIABLE           Job to retrieve the matching file from a variable
          FILE_NAME_FROM_OUTPUT_FILE    Job to retrieve the matching file from an output file
7. Left click on the Job, FILE_CREATED, to view its properties.  Click on Extra Properties tab to view the internal variable that stores the name of the matching file.
8. ​Right click on the Job, FILE_NAME_FROM_VARIABLE, and choose Job Log.  Notice that the name of the matching file is retrieved from the internal variable, ListOfFilesFound, set by the job,
FILE_CREATED, ${job:FILE_CREATED.ListOfFilesFound}.
​File Monitored: /tmp/start.cond.092920201352.txt
9. Right click on the Job, FILE_NAME_FROM_OUTPUT_FILE, and choose Job Log.  Notice that the name of the matching file is retrieved from the file name specified in the Output file field, 
​cat /tmp/start.cond.out.txt
/tmp/start.cond.092920201352.txt
How to use the Start Condition feature with File Modified

Follow the steps below to create a Start Condition for a Job Stream
  1. Login to the Dynamic Workload Console 
  2. Navigate to Design à Manage Workload Definitions
  3. Select Create New à Job Stream
  4. In the General tab, fill in the Job Stream name and Workstation
  5. In the Start condition tab, fill in the values in the fields as shown below:
  • Condition:         File modified         An existing file with a matching name will not satisfy the condition, the file with a matching name must be modified.
  • Workstation:     EEL
  • File:                  /tmp/start.cond.*.txt
  • Output file:       /tmp/startcond.out      Must have a different pattern than the file being monitored.
  • Additional Parameters:  -modificationCompletedTime 120       When a file is modified, the event is not sent immediately, but only after the interval of time specified by -modificationCompletedTime <seconds> has elapsed and during which no additional changes were made to the file.  For other parameters, refer to Chapter 16, Using utility commands, in the IBM Workload Scheduler version 9.5 User’s Guide and Reference.
  • Job name:     FILE_MODIFIED     A file monitor job with this name is auto generated.  This job iteratively keeps monitoring the file and when satisfied, submits a new instance of the Job Stream
​6. Select Create New à Job Definition à UNIX
7. In the General tab, fill in the Job name, Workstation, and Login
8. In the Task tab, enter the following 
​    Script name: /bin/echo "File Monitored: ${job:FILE_MODIFIED.ListOfFilesFound}"
9. Click on Save
10. Select Create New à Job Definition à UNIX
11. In the General tab, fill in the Job name, Workstation, and Login
12. In the Task tab, enter the following 
​     Script name: cat /tmp/startcond.out
13. Click on Save
14. Add the two jobs created earlier to the Job Stream
15. Click on Save
16. The following is the Job Stream definition is composer format.
SCHEDULE EEL#START_COND_JS 
STARTCOND FILEMODIFIED EEL#"/tmp/start.cond.*.txt" INTERVAL 60 
( ALIAS FILE_MODIFIED RERUN PARAMS "-modificationCompletedTime 120" OUTFILE "/tmp/startcond.out" ) 
:
EEL#FILE_NAME_FROM_VARIABLE
 SCRIPTNAME "/bin/echo \"File Monitored: ${job:FILE_MODIFIED.ListOfFilesFound}\""
 STREAMLOGON iwadmin
 DESCRIPTION "Retrieve file name in Start Cond from an internal variable, ListOfFilesFound"
 TASKTYPE UNIX
 RECOVERY STOP
 
EEL#FILE_NAME_FROM_OUTPUT_FILE
 SCRIPTNAME "cat /tmp/startcond.out"
 STREAMLOGON iwadmin
 DESCRIPTION "Retrieve file name in Start Cond from the Output file field"
 TASKTYPE UNIX
 RECOVERY STOP
 FOLLOWS FILE_NAME_FROM_VARIABLE
 
END
​17. Select the Job Stream Name and choose Select an Action à Submit Job Stream into Current Plan

Monitor the Status of Job Stream with the Start Condition with File Modified

Follow the steps below to monitor the status of the Job Stream
  1. Login to the Dynamic Workload Console 
  2. Navigate to Monitoring and Reporting à Monitor Workload
  3. Choose Job Stream for Object Type and click on Run
  4. In the Filter window, enter Start_cond and press Enter
  5. In the resulting view, Right Click on the Job Stream, START_COND_JS, and choose Jobs
  6. Notice that there are 4 jobs in the Job Stream
          FILE_MODIFIED                               Auto generated job to keep monitoring the file
          RESTART_STARTCOND                     Auto generated job to submit the Job Stream
          FILE_NAME_FROM_VARIABLE         Job to retrieve the matching file from a variable
          FILE_NAME_FROM_OUTPUT_FILE    Job to retrieve the matching file from an output file
7. Left click on the Job, FILE_CREATED, to view its properties.  Click on Extra Properties tab to view the internal variable that stores the name of the matching file.
8. ​Right click on the Job, FILE_NAME_FROM_VARIABLE, and choose Job Log.  Notice that the name of the matching file is retrieved from the internal variable, ListOfFilesFound, set by the job,
FILE_CREATED, ${job:FILE_MODIFIED.ListOfFilesFound}.
​File Monitored: /tmp/start.cond.092920201352.txt
9. Right click on the Job, FILE_NAME_FROM_OUTPUT_FILE, and choose Job Log.  Notice that the name of the matching file is retrieved from the file name specified in the Output file field, 
cat /tmp/start.cond.out.txt
/tmp/start.cond.092920201352.txt
​Want to learn more? Write me at Sajjad.Kabir@hcl.com or schedule a demo.

Author's Bio
​Sajjad Kabir, Solutions Architect, HCL Software
 
Sajjad Kabir is an Information Technology professional with over 25 years of diverse industry experience with primary emphasis in IT Architecture and Service Management. Extensive experiences in management, architecture, design, development, implementation, and systems integration solutions in multiple industries, platforms, and network environments. 
Viewing all 209 articles
Browse latest View live


<script src="https://jsc.adskeeper.com/r/s/rssing.com.1596347.js" async> </script>