
Let's quickly go through the definition of RESTful before introducing the RESTful plug-in. RESTful web services, which are services where resources are identified by a URI, are generally referred to as being "RESTful."
According to the standard understanding, REST is an architectural paradigm that enables the introduction of many advantages, such as scalability, performance, and modifiability, into the Web Services that use it.
According to the standard understanding, REST is an architectural paradigm that enables the introduction of many advantages, such as scalability, performance, and modifiability, into the Web Services that use it.
To retrieve and manipulate data on the Web, CRUD operations is the best option, which is an acronym that includes the names of the 4 most widespread and known operations:
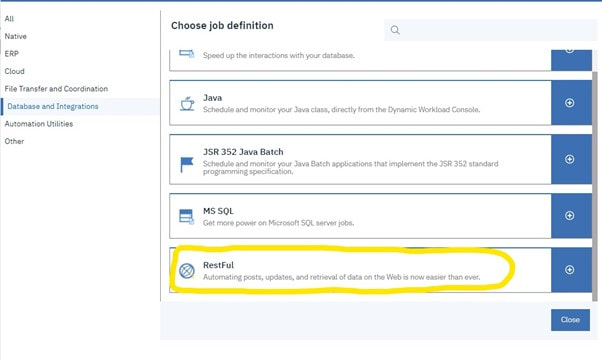
After downloading it, log in to the Dynamic Workload Console and go to the Workload Designer. Create a new job and select “RestFul” in the Database and Integrations section.
- CREATE: used to create a resource, it corresponds to the POST method
- READ: used to read a resource, it corresponds to the GET method
- UPDATE: used to modify an existing resource, it corresponds PUT and PATCH methods
- DELETE: used to delete a resource
- PATCH request.
- Several new authentication methods.
- Tracking request, for which more details will come later.
After downloading it, log in to the Dynamic Workload Console and go to the Workload Designer. Create a new job and select “RestFul” in the Database and Integrations section.
Authentication
In the Authentication tab, you can choose between different options of authentications, if at least one of the two REST calls that the plug-in makes available needs it:
In the Authentication tab, you can choose between different options of authentications, if at least one of the two REST calls that the plug-in makes available needs it:
- Basic authentication: You can choose this option if one or both REST calls need it, by manually providing the username and password.
- Bearer token authentication: You can choose this option if one or both REST calls need it by manually providing the bearer token.
- O-auth authentication: You can choose the options if one or both REST calls need it by manually providing the URL, the method, the refresh token if required, a client id, a client secret, and a scope.
- Azure authentication: You can choose this option if one or both REST calls need it. You can manually provide the tenant ID, client ID, scope, and client secret.
- AWS authentication: You can choose this option if one or both REST calls need it by manually providing the domain, the region, the refresh token, and if required, a client id and a client secret.
- Google authentication with refresh token: You can choose this option if one or both REST calls need it by manually providing the client id, the client secret, and the refresh token.

Figure 2: Authentication page> No authentication
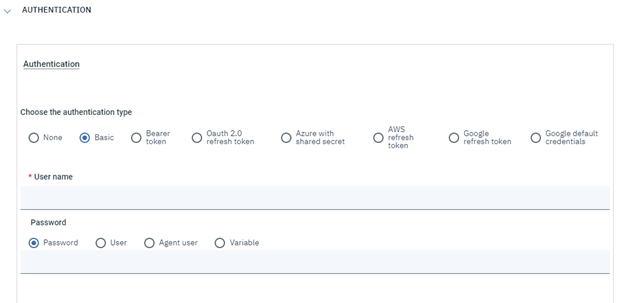
Figure 3: Authentication page> Basic authentication
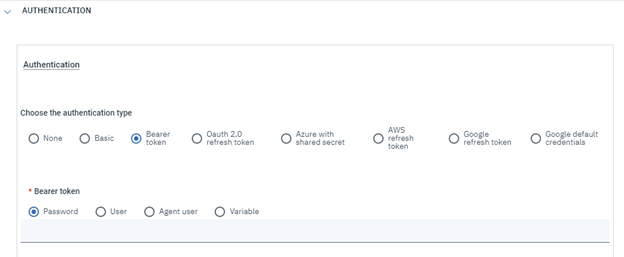
Figure 4: Authentication page> Bearer token authentication
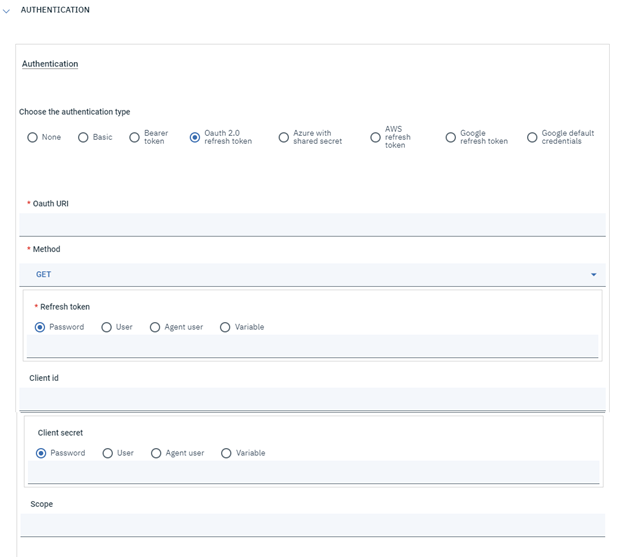
Figure 5: Authentication page > Oauth 2.0 authentication
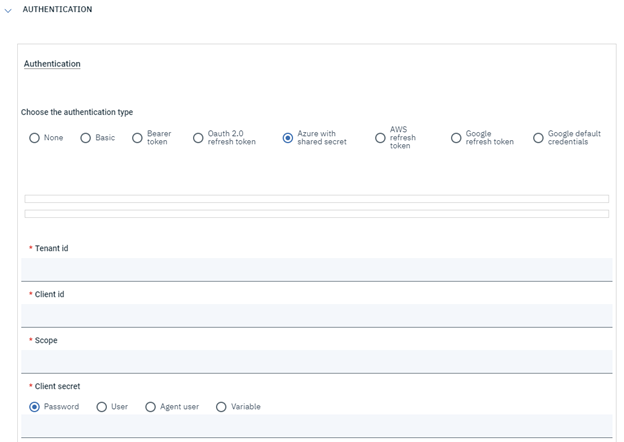
Figure 6: Authentication page> Azure authentication
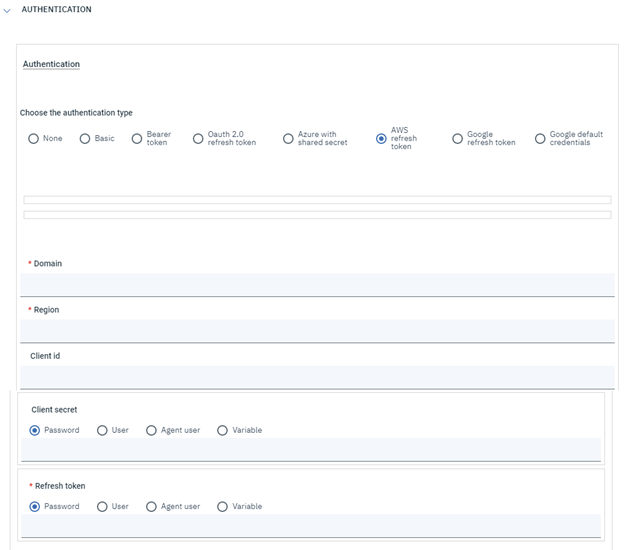
Figure 7: Authentication page> AWS authentication
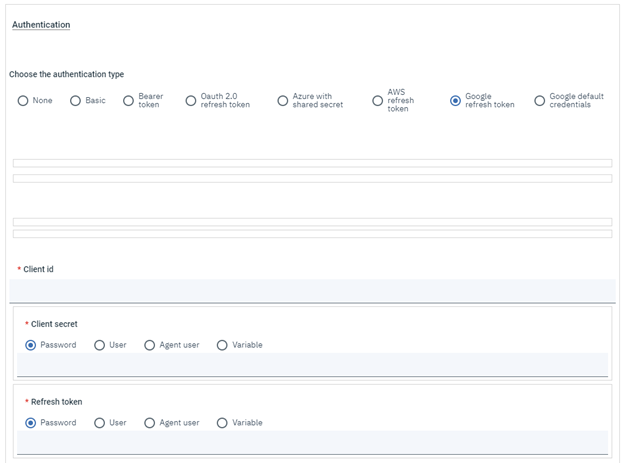
Figure 8: Authentication page> Google authentication with refresh token
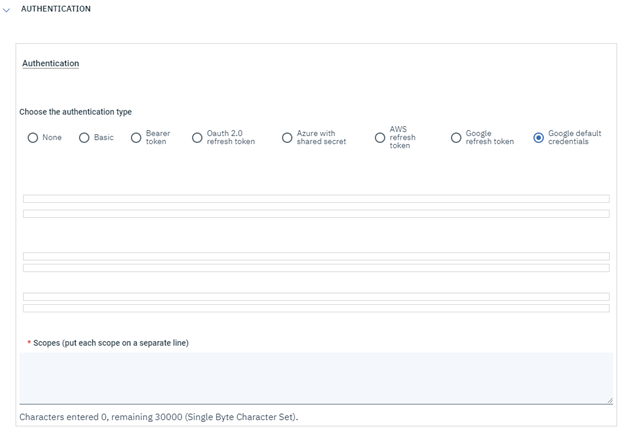
Figure 9: Authentication page> ADC Google authentication
If needed, you can provide a path to a .jks keystore with the corresponding valid password, and also verify the hostname by ticking the checkbox.
If needed, you can provide a path to a .jks keystore with the corresponding valid password, and also verify the hostname by ticking the checkbox.
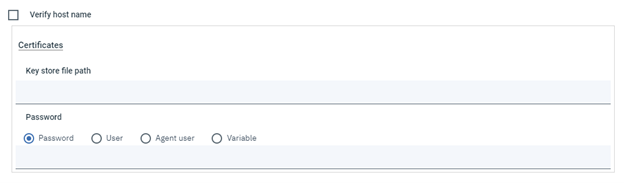
Figure 10: Authentication page> Certificate
Action
You can go to the Action tab and specify the URI associated with the service you want to call along with the method by selecting from GET, POST, PUT, DELETE, HEAD, or PATCH after providing the fields for the appropriate authentication, if necessary. Additional optional settings include:
You can go to the Action tab and specify the URI associated with the service you want to call along with the method by selecting from GET, POST, PUT, DELETE, HEAD, or PATCH after providing the fields for the appropriate authentication, if necessary. Additional optional settings include:
- Query parameters: If you need to specify some query parameters, you can do that by providing, for each one, the name and the value.
- Http headers: If you need to specify some custom headers for the request, you can do that by providing, for each one, the name and the value.
- Accept: You can specify the Accept header.
- Content type: You can specify the Content-Type header. Default is application/Json.
- Body input: If you run a POST, PUT or PATCH request, you must specify a request body, and provide it inside a file for which you need to indicate the path, or directly inside a text area.
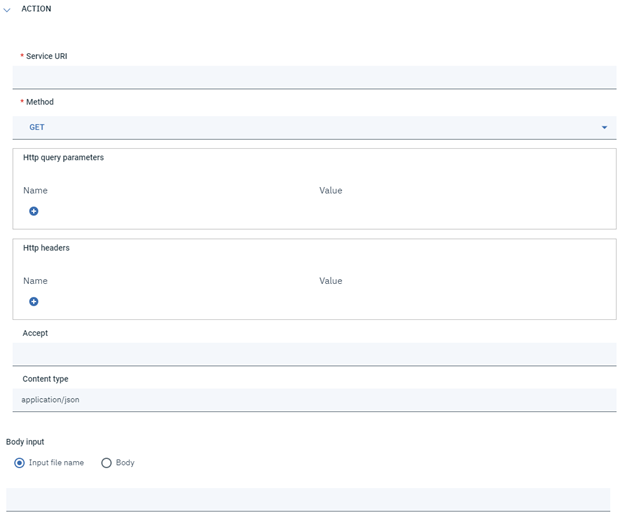
Figure 11: Action page
Advanced
After you have provided the request's information. In the Advanced tab, you can add more details.
After you have provided the request's information. In the Advanced tab, you can add more details.
- Output file name: If you want to save the response as a file, you can enter the path of the output in this field. Note that if you need to run a tracking request, the file will contain the response.
- JSON object result query: You can specify a JSONata query in this field if the response is a JSON and you wish to query a field from the JSON you're getting or evaluate an expression over the JSON. Notethat if you need to run a tracking request, you can only run the query against the JSON that the tracking request returned.
- Number of retries: You can specify the maximum number of retries of the first request. Default is 0.
- Retry interval: You can specify, in seconds, the retry interval for the first request. Default is 30.

Figure 12: Advanced page
Tracking
You can poll a second endpoint when the tracking is enabled till a particular condition is verified. There are three additional fields in addition to those on the Action tab that must be filled out:
You can poll a second endpoint when the tracking is enabled till a particular condition is verified. There are three additional fields in addition to those on the Action tab that must be filled out:
- Exit condition: A boolean JSONata query representing the condition that you want to verify each time the tracking request is executed during the polling. If verified, the polling will end. This boolean query should be written with respect to a JSON context, which contains both the context of the first request (we will call it MainContext) and the context of the tracking request (we will call it TrackingRequest). Both contexts are JSON objects with the following attributes:
- StatusCode: an integer field containing the status code of the response.
- StatusLine: a string containing the status message associated to the status code.
- StatusResponse: a string containing the combination of status code and status line.
- headers: a JSON object containing response headers in the form “key”: “value.”
- body: the response body
- Every: A field where the tracking request's retry interval must be entered. Several formats are available; they are listed in the field's label.
- Timeout: a field where the tracking request's retry interval must be entered. Several formats are available; they are listed in the field's label.
- When specifying fields for the tracking request, you have the possibility to parameterize the request, by passing values coming from the MainContext, by using JSONata queries, with the syntax %{jsonata_query}.
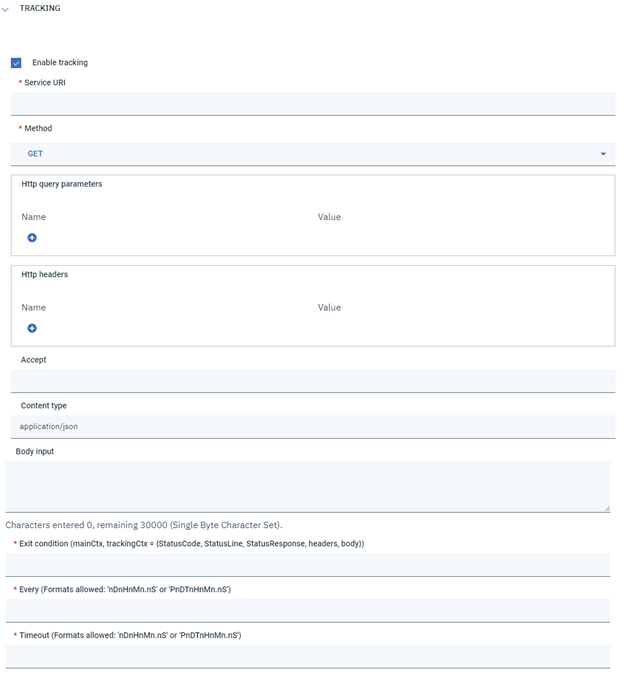
Figure 13: Tracking page
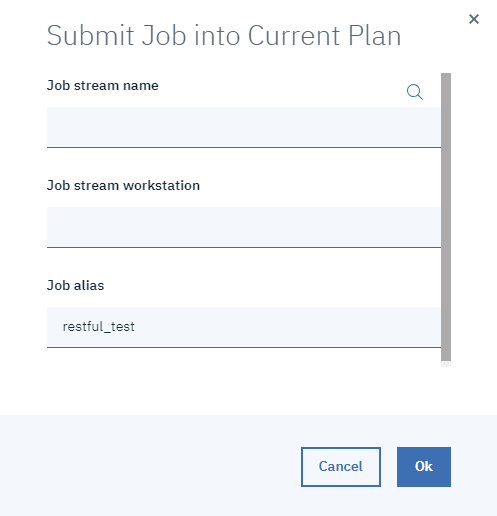
Submitting your job
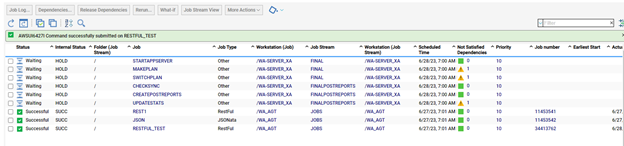
You can submit the work at this time using the current plan. After you click Ok button then click the Submit icon. You can navigate to the Monitoring and Reporting page to view the status when a confirmation message is displayed.
You can submit the work at this time using the current plan. After you click Ok button then click the Submit icon. You can navigate to the Monitoring and Reporting page to view the status when a confirmation message is displayed.
Monitor Page
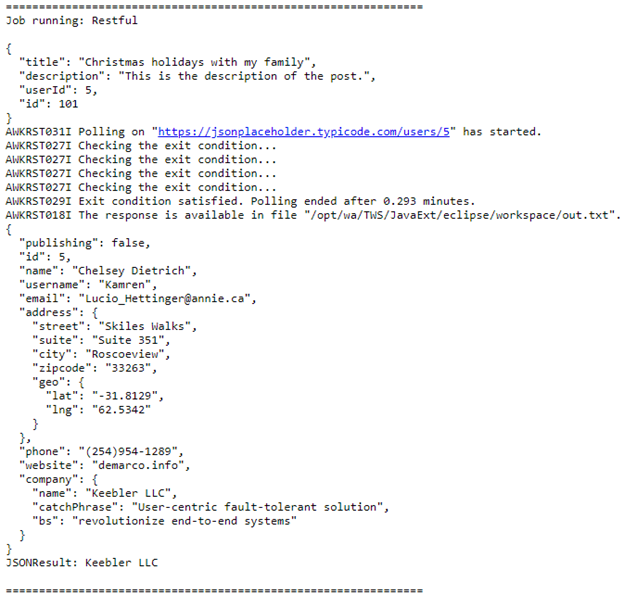
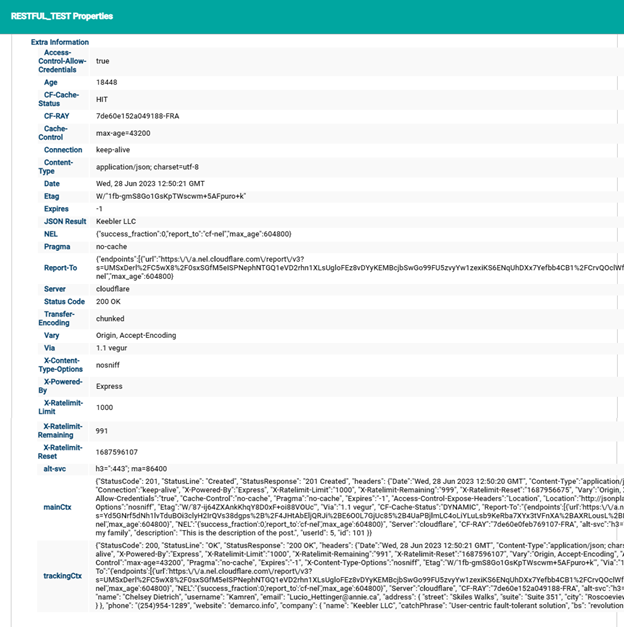
Joblog
You can download the RESTful plug-in from here.
Reconnect and Kill
In case the server goes down, the plug-in can resume the tracking activity. In particular, the plug-in recovers the exit condition which needs to be checked each time the tracking request is executed, as well as every and timeout parameters, so that it can resume the tracking without any variation.
During the reconnect, the plug-in checks it the MainContext is available: if it’s not available, then the plug-in re-executes the first REST call in order to get the MainContext, otherwise it will only restart the tracking activity.
Also, before executing the tracking request each time during polling, the plug-in checks if the agent was manually killed by the user, because if it so, then the job needs to be stopped.
Backward compatibility
The latest version of the RESTful plug-in described in this blog post is backward compatible with respect to the previous version, so if you want you have also the possibility, by using the console, to save and submit an old job definition of RESTful.
Author
| Software Engineer (Backend Developer) at HCL Software, Ivan Giacomoni. works for Workload Automation as a Backend Developer. gaining knowledge of Java, Microservices, and Docker. I have a lot of interest for both tennis and football as hobbies. |  |
Co-Author
| Ernesto Carrabba, Product Manager, HCL Clara, HCL HERO and HCL Workload Automation Ernesto Carrabba is the Product Manager for HCL Clara, HCL HERO and HCL Workload Automation. Ernesto is a very dynamic product manager with experience in building and launching IoT products, combined with a master's degree in mechanical engineering and study researches on Augmented and Virtual Reality. |  |